Bodywork 101 – Patience to make it flat


Bodywork 101 – Straighten a Body Panel like Pro
 You can’t expect to learn bodywork in 1 afternoon, no matter how good the teacher is, but one thing’s for certain: You’ll never learn unless you get in there and try it. This blog and the ones that will follow will show some basic bodywork techniques anyone can do (especially if I can do it!). Since I’m starting from nothing, I hope the pictures and videos will help you get started too.
Just starting, that’s where I am with my 1963 Falcon Wagon build. The body’s really not that bad, but after 45 years on the road, a Sherman tank needs panel work before glossy paint. As I mentioned in the “Holman & Moody Boss 429 – (you should read this)” I headed over to Squeeg’s Kustom to get started learning. I hooked up with Matt Vesay and interrupted his work on a stretched Dearborn Deuce body to get started on the upper splash apron (just above the front bumper) from a custom getting painted. The panel was fiberglass, but that didn’t really matter for what I needed to learn which was anything and everything! I told Matt I didn’t even know how to mix the body filler, so he knew to start from the beginning. As the photos walk you through the progress, you’ll see that patience is key and that even when things look really bad, you can fix it.


 As you can see, the panel’s already been sprayed with Squeeg’s high build primer. You can also see it’s in pretty bad shape from media blasting. It would be tough to get it back from blasting in this shape, but better to have the loose material come off now then after you’ve painted!
To make sure we were ready to lay down some filler, we hit the panel with a guide coat and went to work with the DA sander and 80 grit paper. Matt said to keep the DA pad flat on the panel for best results. Tilting it on the side will dig into the panel and will also tear up the pad. For the deeper spots (showing black from the guide paint) we used a smaller headed DA sander and tilted it on the side cause we needed to dig in. Towards the end of the sanding I needed to do, Matt showed me how the paper was much smoother now. It was still cutting, but like 120 or 150 paper. He said, “Sand paper’s a lot cheaper then labor” so change it often.
 The DA’s not meant to make the panel flat, but it will show high and low spots. Where the primer’s gone and raw fiberglass (or metal if it were a metal panel) is showing, that’s what I thought was a “high spot”. I then learned that it’s not really a high spot, 9 times out of 10, it only seems high cause it’s LOW all around it. That’s typical for body panels that are much more likely to be pushed in than to stick out. But, anywhere the yellow primer’s still there, or black guide coat’s still showing, that’s a lower spot that needs filling. It’s almost like a topography map when you’re finished.
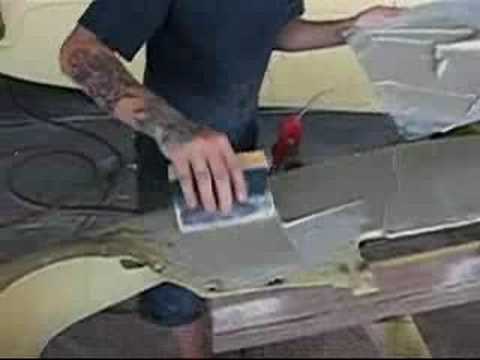
Next, we need to add some filler. I mixed filler 1 time and it “kicked” so fast, I could barely spread it. “Kicked” refers to the chemical reaction between the filler and the hardener. With more hardener, the kick happens quicker. Not enough hardener and the filler will never get completely hard. Believe me, that’s a gooey mess. I made that mistake too. There’s instructions on how much filler to add, but you’ll more then likely have to experiment. We’re mixing outside in Arizona in July. It’s damn hot! In 100+ degree temps, if you add the hardener per the instructions, you better be fast! Matt mixed up just a little filler to show how much hardener he’d use and also, how to properly mix it. The mixing’s really important for a uniform kick and also to minimize the chance for air bubbles in the filler after you’ve laid it down. Keeping the filler on one side of the putty knife only, Matt says to “flatten and fold” the filler until the color is uniform. The hardener color is much brighter then the filler, so you know when it’s not mixed well. After less then a minute of pulling the filler flat, flipping, then repeating, it was ready for the valence. Check the video.


The next lesson was applying the filler. Not too much to this, really, just make sure to push evenly as you pull the filler across the panel. The key is to fill the low spots so don’t push too hard and scrape the filler back out once it’s in there. Go any direction you need to get it smooth but don’t worry if it’s not as smooth as Matt’s work. If it’s rough or has a few more ridges, you’ll just need to do more sanding! These are pictures of Matt’s work and my first shot at spreading filler. Can you guess which is which? Each and every time you spread filler, make sure to clean up. Use a another putty knife if you need to like this. Here’s a video of how Matt spread the primer. Smooth easy is the key…
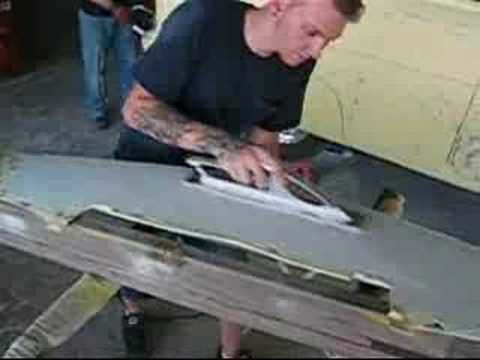
I skipped a few steps with that video. We had already done one other key step to getting a panel flat and ready for paint. That’s board sanding. Any time you use a piece of sandpaper on a panel, you need to put it on something FLAT. That can be a body man’s sanding block, or as simple as a piece of aluminum stock cut to length. Even professional shops like Squeeg’s use this simple tool. It helps to buy the sand paper with the sticky already on the back. The DA paper’s usually like this, but the the sheets of paper may not be. I bought a roll of 80, 150 and 220 paper with the sticky on it.We put on some filler, blocked it, more filler, blocked it again, then more filler again. See the pattern here? As much as we’d all like to get it right the first time, that’s just not how it works. Patience is KEY. The last pic shows a closeup of what the panel looks like. It’s pretty rough, but we’ll handle that later. Here are some steps that you missed.


Going back to the block sanding, here’s a video of how it’s done. Matt simply says to “cross your corners” and you’ll notice that the sanding motion is typically NOT along the length of the board. It’s held at a slight angle to make sure the edges don’t dig in. Another video:


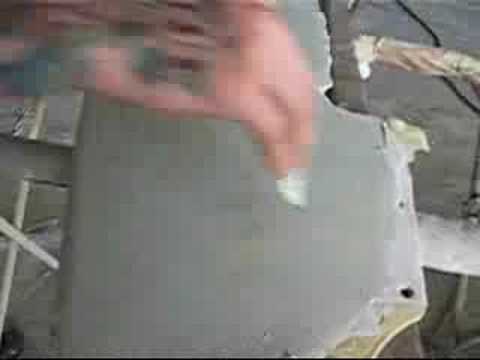
At some point, the panel’s looking flat. Especially to me the guy that’s just trying to figure this out. Matt could run his fingers over the panel and pic out low spots and plan his next move, but for me, I’m kinda lost. Matt suggested another guide coat so we could easily find the low spots and fill them again, if needed. At some point, the lows can be filled by the filling primer. That’s where we would stop. These pics show the guide coat applied, then what a low spot looks like after block sanding. Like before, anywhere the guide paint is, that’s low.I probably should have mentioned, up to this point, we’ve been using 36 grit sandpaper. If you’re like me, you’ll be tempted to skip to a lighter grit paper cause that 36 stuff is like rocks on the paper. But don’t. Stick with the plan. The next step Matt showed me is how to apply filler to fill-in the 36 grit scratches. After that, you hit it with 80 grit sandpaper, then you can fill in those scratches with the filling primer. I keep mentioning “filling primer” which may not mean much to you. I’ve been getting a lesson that too. Later on, Doug Jerger from Squeeg’s will fill us in on what to look for in a filling primer. Check this last video.
So from here, we were done. Matt made alot of this look easy, but when I tried it myself (blog past due, sorry) I had trouble mixing the filler, applying it and sanding it. I sucked. But, as we did in this example, I mixed again, applied again and sanded until I got it right. I can’t over emphasize: Patience. I hope everyone got something out of this. I’ll be showing you my attempt soon. Please let me know what you think. What am I missing?
Every story I’ve written about this build can be found here: 1963 Ford Falcon Wagon Build
Tags
Related Posts
Share This


Cool post! Would love to see more hands-on video and tech posts… it’s interesting, as well as informative, and having a well-known and respected shop offering some knowledge is what makes this place so great!
…OK, and it’s fun watching someone put all of this into practice as they learn! Bravo, Craig!
…MORE!!!