
Ford Falcon Inline Six Long Block Build Video I've been working on my 1963 Ford Falcon wagon for way to long now. Ever get the feeling about your project like... "It'll never be done!" Well, let's celebrate some progress! The short block's put together and waiting the next couple steps in the powertrain build: Assemble the head and the rest of the long block Prep and Install of the T5 transmission (I know, I was planning on re-using the Dagenham 4 speed) The video below is a step by step build of the 200 inline six. With guidance from my pops, a retired Ford mechanic, he shows me how-to, then I proceed to give it my best shot. I'm not always successful the first time, maybe like you might be... so, I hope everyone interested in building their own engine can learn a little something, and maybe have a laugh at the same time! If you're looking for more info on building or modifying a ford inline six engine, make sure to check out this discussion forum: Fordsix.com. With members from all over the world, including...
Daily Driver Garage: Air Filter Change
posted by GreaseGirl
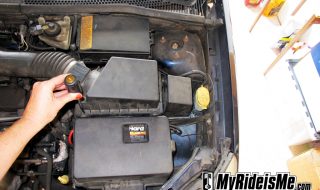
How to Change Air Filter in a 2002 Ford Focus A friend recently needed a couple simple things done to her 2002 Ford Focus. I’m a classic car girl, and so far have almost exclusively only worked on old cars – but I couldn’t turn away an opportunity for learning, so I told my friend I’d look into fixing her problems. What she needed was an air filter change, brake flush, and to replace the sway bar linkage. Having never looked under the hood of a Ford Focus before, I popped the latch and looked for the air filter. I saw a couple places where I thought it might be lurking beneth, but I wasn’t sure. So to try and make sure I went looking for some answers in her Ford Owner’s Manual. I was surprised to find they didn’t have this basic information! So then I turned to the internet. Again, I was surprised that there were plenty of threads on Ford Forums of people looking for the air filter – with one fellow stating that even the dealership tried to tell him there wasn’t one. Now…I think...
How To Metal Flake Your Ride
posted by GreaseGirl
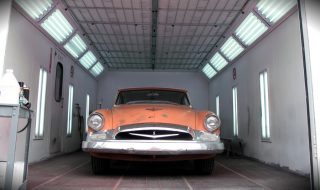
How To Metal Flake Your Car Just because I love grease, doesn't mean that I don't love sparkly things too! Before going to Viva Las Vegas this year, I wanted to add a little bling to my 1955 Studebaker Champion with a metal flake paint job. Studie and I have been through a lot together in the five years I’ve owned and drove her. I’ve become attuned to her original patina’d coral and white paint job. So originally the thought of changing her exterior in any way made me nervous. But the more I thought about adding a subtle sparkle to Studie’s white roof portion, the more I liked the idea. Not knowing the first thing about how to paint, I was lucky to have an expert nearby. Pati Fairchild is the newest member of my car club, the Gasoline Girls. She also happens to be a professional paint and body chick who teaches the subject at El Camino College. After polling friends on Facebook and looking through various paint samples, I paid a visit to Coast Airbrush in Anaheim for my final selection. I went in knowing I wanted...
Wrench and Learn: Overheating Problems Fixed Roadside
posted by GreaseGirl
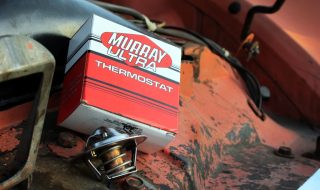
How-To Fix Engine Overheating Problems on the Roadside What do you do when your car overheats? With temperatures reaching the 80's this past week in LA, the 383 small block Chevy in my 1955 Studebaker got hot in protest. Thursday was my first problem. After 30 minutes of freeway driving and 30 minutes of stoplight-and-street traffic, I lost power and came to a stop. After letting Stude cool down, the only thing I noticed upon inspection was that my fluid was a little low. I filled up the radiator with a coolant/distilled water mix and was back on my way, hoping maybe this was all I needed. I got home fine that evening and through the 25 mile drive to work the next day without a glitch. This made me feel better, but I was very worried... Studebaker had a date as a wedding getaway car for some close friends of mine on Saturday. I didn't want her to miss out on the excitement! As I pondered what was going on with my overheating, I knew the most likely candidates were the radiator, water pump, or thermostat. I’ve dealt with...

Eight Myths About Car Batteries – Take the Test
posted by pikesan
Truth about Batteries: 8 Myths Revealed! Setting your battery on concrete will ruin it. An AGM battery is a "gel" battery. If a battery is dead, all it needs is a jump. Starting your vehicle up periodically while in storage is good for the battery. An OPTIMA is ruined if it is deeply-discharged. Only off-road guys care about vibration-resistance in a battery. A longer warranty is always better. Dropping a battery will help break up sulfation and restore performance. Do you agree? These are all FALSE! Start story: 1. Setting your battery on concrete will ruin it. FALSE! Back in the olden days, batteries had wooden cases, which could expand if they came in contact with moisture, possibly causing damage to those batteries. Wooden cases were then replaced with hard rubber cases. Electrical current could be conducted through those cases, if moisture on the floor allowed the current to find an electrical ground. Modern batteries of today are constructed with polypropylene cases, which is far more insulated than the hard rubber cases of years past. That means not only can you set a new battery on a concrete floor,...
Classic Car Insurance – Agreed Value Insurance Explained
posted by pikesan
Agreed Value Car Insurance - Do it Right No matter what kind of ride drives your passion, a hot rod, classic car or collector car... or those antique cars that spend most of the time in the garage, we all need a special kind of insurance. That awful day when you need to actually use your classic car insurance, you better be ready! I'll try to help here by answering: What is Agreed Value Car Insurance? How is Agreed Value Established? How does MyRideisMe.com make Agreed Value easy?! What is Agreed Value Car Insurance? It's the leading type of classic car insurance so we should know exactly what it is, right? I got a little confused when my pops was shopping for insurance for his '64 Ford Fairlane and '23 Ford T-Bucket. Another insurance company said, "Just watch out... some insurance companies only say that's the agreed value..." Is there something tricky going on if the worst happened and my cherished ride gets totaled? To get the real answer, I went to MyRideisMe.com sponsor and my insurance company, Condon Skelly. Condon Skelly said: "Our policies are 'Agreed Value' meaning whatever...

3 Custom Car Photos – Verp or Cool?
posted by pikesan
Custom Car Photography - HDR Special Ed's 1956 Buick Special shot at the Mesa Cruise - 10/24/2010 (click on shot to zoom!) What's HDR? In case you forgot, my friend Alan wrote a great story about "High Dynamic Range" or HDR. What it is, how he does it and a few resulting shots. Alan's Car Photography HDR. Since Alan introduced me to HDR, I've always wanted to try it. I have a Nikon D90 that makes bracketing photographs easy so it was finally time to try it. How'd I do? For me, HDR either makes a WOW effect where I can't imagine seeing something so beautiful, (just so you know, I have a soft-spot for sunsets) or the photo looks too digital, faked and generally induce a three-quarter verp. There's certain amount of funky-artsy-cool in the shot in both cases, but obviously, I'm shooting for the WOW. Right now, I think I'm still over digitized, pretty noisy (in film it was "grainy") and showing I've never done this before. Gonna work on it... In my defense, I used the first free HDR software set I could find. It's called...
Learning How-to Set A Gap In Spark Plugs
posted by GreaseGirl
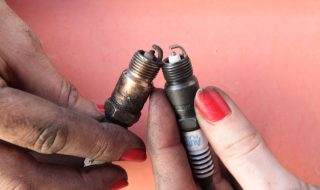
I've known for awhile that I needed to change the spark plugs in my Studebaker. But I'd heard things. Things like you could break the plug inside your motor if you did it wrong and to be sure to tighten the plugs to the correct tension. So although I knew they should be changed, I was scared to do it on my own, and my spark plugs in there were working...right??? As I'm learning, I'm seeing that spark plugs (although they don't cost much and are small little things) are a major, MAJOR component of your engine. Without 'em, your engine wouldn't run. Without 'em working at their best, your engine won't run at its best. So as part of last weekend's wrenching adventure up at Gene Winfield's in Mojave, I changed my spark plugs...for the very first time! Gasp! The fellow at the local parts store recommended Autolite over ACDelco plugs which I had been running (What do you think? Leave a comment below!) I was surprised, and a little confused, when he informed me the gap for my application was .052. What?!? While perhaps some people just throw...
5 Things to Know About Classic Car Insurance
posted by pikesan
How to Find Classic Car Insurance Photo by Ron Ricci Are you one of those people that never has anything bad happen? If so, you may not care about this info. The rest of us need classic car insurance. Once a year, you get a letter from your classic car insurance carrier saying it's time to renew. For the last several years, I wrote the check. For me, it was less than $200 and since I'd never used it, it was working just fine! Trouble is, since I got my roadster upholstery done, I really wanted to increase the the agreed-on value. That's when I found Condon & Skelly. I needed new insurance and they needed to find new ways to get the word out about their insurance products. Condon & Skelly advertises here now, but that happened AFTER purchasing my new insurance. Why change insurance? For me, it was simple: I got the higher value for my roadster I wanted, no questions asked I got better insurance coverage overall Coverage went from $100k to $500k Same deductible Price went down by $10! Finally, I received great service! I...
Exhaust 103 How-to: Mufflers, “More than Meets the Ear”
posted by GreaseGirl
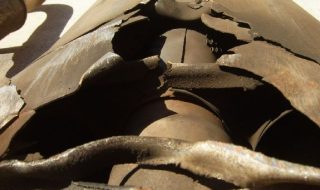
Saying that there was a hole in my muffler would be an understatement. My muffler was torn up! This happened from years of scrapping over bumps. Me being the car-learning girl that I am, I thought “muffler…that just quiets noise, right?” Wrong! When it comes to mufflers, there’s much more than meets the ear. Follow along with me as I not only learn about and change my mufflers…but actually get to make a pair of custom glass-pack mufflers! When we’re talking about mufflers, we’re talking about part of the car’s exhaust system. One thing exhaust systems do is carry the fumes created by the engine’s combustion out of the engine. But what makes exhaust systems so important is that the way in which those fumes are carried out affects the pressure (a.k.a. backpressure) of the engine. And backpressure has everything to do with the performance of the engine. When choosing a muffler, it’s not only the muffler but the entire car and exhaust to take into consideration. A few things to think about are: Engine size Level and pitch of sound desired Pipe size Ground clearance While I was...
Mustang Rear Gear Swap Part 2: The Install
posted by Hechtspeed
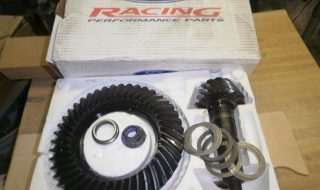
So, if you missed Part 1, The Tear Down, read that first, then come back for this, Part 2: The Install. So, at the end of Part 1, we had removed the old ring and pinion. Now we're ready to install the Ford Racing 3.73 ring and pinion gear set from AmericanMuscle.com. First, I wanted to show you what the Ford Racing 3.73 Gear Set comes with. Ring gear, check. Pinion gear check. Crush sleeve, nut and shims, check, check and check. But remember, its SUPER DUPER HIGHLY recommended that you ditch this crush sleeve and get yourself the Shim Spacer Pack for easier preload setup. You'll thank yourself later, trust me. OK with Ford OEM/Racing gears i have found that they are pretty much ground on the same centerlines. So if you measure the pinion and shim after you've removed the pinion bearing and match the length to your new gears by adding the correct shim to equal the first measurement, you will be very close. Now that being said, I always have to check the gear pattern and add or subtract shims to get the gear pattern correct. it is recomended to...
Part 1: Do-It-Yourself 3.73 Gear Swap How-To
posted by Hechtspeed
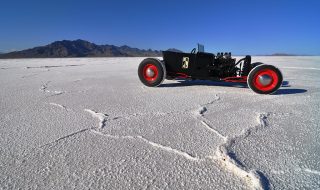
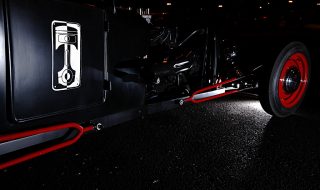
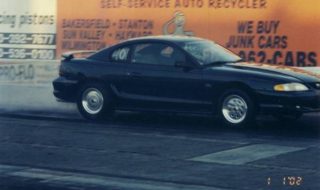
One of the first hot rod tricks a hot street car gets is a set of gears. If your 'Stang's 8.8 inch rearend came from Ford with a set of 3.08's or even worse, 2.73's, the car was pretty much a DOG! A set of 3.73's, 3.90's or even 4.10's really wakes 'em up. Don't throw away those 2.73's though, you may wanna go for a run down the Salt. haha Here is "Calera Kid" himself doing a burnout at the now defunct L.A.C.R. drag strip. This was taken at the "Hang Over Nationals" in 2002. Anyone ever hit the Hang Overs at Palmdale? "Sally" has run a best time of 12.85 seconds at 106mph at Famoso with 4.10's. Eventually the plan is to replace the stock ported E7 heads for the GT40P heads and the stock cam with a higher lift unit. For now, a set of Ford Racing 3.73 ratio Ring and Pinion from AmericanMuscle.com might allow the low revving stock head/cam "five oh" motor to utilize the good torque with a set of 3.73's. If you're a "do it yourself" hot rodder, here's the step by step instructions for the swap. Part 1 will focus on the...