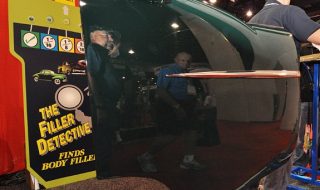
Best New Tools from SEMA 2010 I'm no body man, and I'm not sure I want to be. It's hard work, takes a long time to learn and it's probably done wrong as much as it's done right. I do know something about inspecting bodywork in preparation for paint or checking a painted car to see if it's straight. Straight has different meanings though. To some professional body men and to car owners who'll only be happy with the best, it means "like a mirror". I looked at the door shown above for a while cause I knew it had dents in it. These dents had been filled by body filler, probably a ton of it... otherwise, there wouldn't be much to show for The Filler Detective! To review, "Body Filler" is the generic term for products such as: Bondo (a 3M product), Putty or spot putty, Feather-Rite or Duraglass from USChemical or Evercoat. Whatever you call it, filler is part of the bodywork process and in very general terms, the less of it you use, the better the bodyman or bodywork. Without going into too much detail on that,...

Falcon Build Update #4 Tailgate Drama
posted by pikesan
Ford Falcon Wagon Tailgate I should have called this "The Good, The Bad and the Ugly" as I update everyone on the MyRideisMe.com 1963 Falcon Wagon build. It no doubt I drastically underestimated the work needed to get ready for paint! Also, my plan for the Falcon changed from a quick paint job to, "I might as well do it right" which of course is the right way to go. I've made some good progress on the body work even though Arizona's held 100-plus degrees making it damn hot in the garage. It'll be another 20 days before it cools down, so waiting's not an option. Damn! I'm writing about the weather! Want the good, the bad or the ugly? OK, bad first. Remember the blog when I showed off my skills filling the back-up lights in the tailgate. Please disregard everything I said! I screwed up that tailgate beyond reasonable repair, at least for me. Luckily, I have Mr. Freeze, (my buddy Rob) backing me up with another tailgate on hand (and rust free!). The original tailgate was repaired (another big pile of manure the...
Bodywork 101 – Patience to make it flat
posted by pikesan
Bodywork 101 - Straighten a Body Panel like Pro You can’t expect to learn bodywork in 1 afternoon, no matter how good the teacher is, but one thing’s for certain: You’ll never learn unless you get in there and try it. This blog and the ones that will follow will show some basic bodywork techniques anyone can do (especially if I can do it!). Since I’m starting from nothing, I hope the pictures and videos will help you get started too. Just starting, that’s where I am with my 1963 Falcon Wagon build. The body’s really not that bad, but after 45 years on the road, a Sherman tank needs panel work before glossy paint. As I mentioned in the "Holman & Moody Boss 429 - (you should read this)" I headed over to Squeeg’s Kustom to get started learning. I hooked up with Matt Vesay and interrupted his work on a stretched Dearborn Deuce body to get started on the upper splash apron (just above the front bumper) from a custom getting painted. The panel was fiberglass, but that didn’t really matter for what I needed...

Falcon Build Update #3- The Roof
posted by pikesan
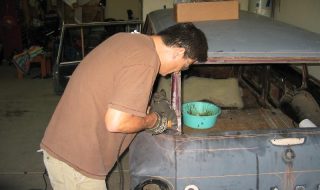
I think it was Earl Sheib who said, "Body work is glamorous!" He was lying! Ok, I made that up. Body work's dirty and you have to use a bunch of tools that make noise. I like that part! But, it takes so much time. It's hard work. This week, I enlisted another friend, Joe Nagy. He came over to hit the roof of the wagon, and that we did. (for a good laugh, check out the Earl Scheib home page and the endorsement from Danny Boneduce) On the left, you can see where we started. For some reason, I really like wagons, but I guess that was before I wanted to paint one! The roofs, as they're known, are LONG. I'm pretty lucky that the roof's straight and basically trouble free except for more of that black primer filled with that strange oil the previous owner used to keep it sorta-shiny. (I already said, please don't do that...) Joe and I fired up the wire wheel and DA sander only to find that sucked. From there I decided to go back to the paint stripper to ease the...
Falcon Strip Party Update – What not to do…
posted by pikesan
1963 Ford Falcon Build Update In case you missed the last story, I'm rebuilding my 1963 Falcon Wagon. Originally, I just planned to put some paint on it and re-do the interior, but after inviting a bunch of friends over (here's the story), my wagon's now a stripped hulk sitting in my garage. Borderline panicking but not quitting, I've still got great friends helping out. We're making progress. It'd be easier to get out to the garage if it wasn't 112 today! First off, I have to mention the tireless help I've been getting from my friend Ken Ford. (perfect name for the project, right?) Ken's a body guy and was looking for a reason to get dirty on a project. He's got a Harley at home now has built several VW's in the past, including a few vans, so he knows how to get body panels looking good. It's a good thing too! We've been moving around the car looking for disasters. We really only found 1. The previous owner decided to fill the cowl vent. I guess it looks a little smoother, but I'd...