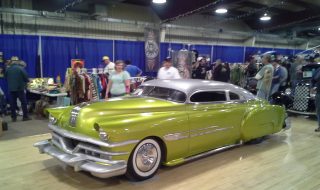
Havin' Fun in the Midwest Sun! If John Wells wrote up a recipe for the perfect hot rod event, it would look something like this: Take one large bowl of tradition Fill it with real hot rodders (no fillers, posers or fakes, please) Add in heaping helpings of patina, chrome and some shiny customs Pinches of flirty pinups, great vendors and some parts swapping welcome Surround the whole thing in excellent tunes and activities that can be enjoyed by the whole family and… We got us a hot rod festival! A little indoor action as well You have to wonder if John is just a little obsessed as the details for these shows is becoming legend. Worked heavily by volunteers (myself included!), the Vintage TorqueFest for 2014 in Dubuque, Iowa May 2-4, drew hundreds of vehicles and vintage bikes and thousands of spectators from 9 states, all carefully orchestrated so there was ample parking, great food available and a vibe that you just couldn’t help but enjoy. These old Lincolns are custom from the factory! The sun shown brightly Saturday when the bulk...
Vintage TorqueFest 2014, May 2-4 in Dubuque, Iowa
posted by Jim Volgarino
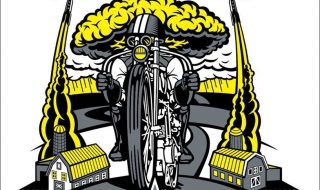
What Makes This Show So Different? It's not just a show! It's an all-out, ultra-cool festival!!!! Artists, live bands, swap meet, vintage apparel and furniture dealers, classic pin up girl contest, vintage motorcycles, hot rods, and custom cars will all join in one group at the Dubuque County Fairgrounds. Cars and motorcycles are already registered from MI, OH, IL, MN, KS, MO, NY, MA, SD, TX, OK, IN, and of course many from WI and IA. The car count is expected to be around 600-750 classic hot rods. This show strives to bring back a specific time in history. A period before muscle cars, and before old cars were brought up to date with digital technology. In an attempt to solidify this specific era there is segregated parking. There will be a Friends parking area for the cars that don’t meet the entry guidelines. With the inclusion of the Friends parking area (an area designated for cars that were made after 1964) there could be 800 cars rolling into the Fairgrounds! Live music from internationally known music acts will be playing at the...

1956 Ford F100 – Dual Hemi’s Just in Case He Needs to Pass!
posted by pikesan
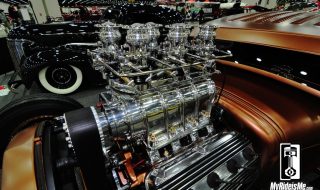
2014 Detroit Autorama - Hot Rod's at Their Best #5 I found out some about the auxiliary power plant from the owner: "By the way, the motor in the back is "functional". We have LED lights for brake and turn signals in the water ports of the heads, the gas filler is in the bellhousing for the rear mounted stainless tank and the oil pan is hiding the cut out in the floor for the pumpkin to come though on the nasty sucker bumps." Many times, I'll take bunches of pictures of hot rods I like at a car show. Too many times, I don't post those pictures cause I never interviewed the owner. It's best for me, and hopefully you the reader to see AND hear why, "My Ride is Me" but if should I hold back the pictures? How many visitors only look at the pictures anyway?? This time, I did worse than normal and didn't get an overall shot of the truck! But... here's the Hemi up front! That makes 2 Hemi's and one bad F100! The Other Best Hot Rods from...
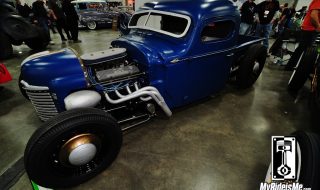
1947 International Pickup – 390 FE Big Block Powered Hauler
posted by pikesan
2014 Detroit Autorama - Hot Rod's at Their Best #4 Many times, I'll take bunches of pictures of hot rods I like at a car show. Too many times, I don't post those pictures cause I never interviewed the owner. It's best for me, and hopefully you the reader to see AND hear why, "My Ride is Me" but if should I hold back the pictures? How many visitors only look at the pictures anyway?? The Other Best Hot Rods from Detroit Best Hot Rod #1 - Nostalgia 1932 Ford Roadster Best Hot Rod #2 - 1930 Ford Model A Best Hot Rod #3 - Blown Hemi 1929 Model A Best Hot Rod #5 - Dual Hemi 1956 Ford F100 Want to see more great hot rods? Check out the Hot Rods Page at MyRideisMe.com Here's a 1947 International pickup from the basement of the 2014 Detroit Autorama basement. What first struck me about this hot rod and many others in Detroit is the variety of engines! Don't you get tired of too many small block Chevys? No denying their worth, but... I like...
1929 Ford Coupe – Blown and Bad Model A Hemi Hot Rod
posted by pikesan
2014 Detroit Autorama - Hot Rod's at Their Best #3 Many times, I'll take bunches of pictures of hot rods I like at a car show. Too many times, I don't post those pictures cause I never interviewed the owner. It's best for me, and hopefully you the reader to see AND hear why, "My Ride is Me" but if should I hold back the pictures? How many visitors only look at the pictures anyway?? The Other Best Hot Rods from Detroit Best Hot Rod #1 - Nostalgia 1932 Ford Roadster Best Hot Rod #2 - 1930 Ford Model A Best Hot Rod #4 - Big Block 1947 International Pickup Best Hot Rod #5 - Dual Hemi 1956 Ford F100 Want to see more great hot rods? Check out the Hot Rods Page at MyRideisMe.com Here's a 1929 Model A with a blown Hemi shown proudly in the UP-stairs car show at Detroit Autorama. This hot rod's clearly one of my favorites... I picked it as a Best Hot Rod for a story I did at Power and Performance News. Check it out! I'd...
1930 Ford Coupe- Winter Dream Model A Hot Rod
posted by pikesan
2014 Detroit Autorama - Hot Rod's at Their Best #2 Like I said in the 1932 Ford "Perfect Deuce Hot Rod" story, many times, I'll take bunches of pictures of hot rods I like at a car show. Too many times, I don't post those pictures cause I never interviewed the owner. (I did a little this time!) It's best for me, and hopefully you the reader to see AND hear why, "My Ride is Me" but if should I hold back the pictures? How many visitors only look at the pictures anyway?? The Other Best Hot Rods from Detroit Best Hot Rod #1 - Nostalgia 1932 Ford Roadster Best Hot Rod #3 - Blown Hemi 1929 Model A Best Hot Rod #4 - Big Block 1947 International Pickup Best Hot Rod #5 - Dual Hemi 1956 Ford F100 Want to see more great hot rods? Check out the Hot Rods Page at MyRideisMe.com So here's another fantastically done Model A hot rod coupe from Dave Debaar. Dave told me this is one good thing to come out of long winters! He said, "When the...
1932 Ford Roadster – The Perfect Deuce Hot Rod in 22 Pictures
posted by pikesan
2014 Detroit Autorama - Hot Rod's at Their Best #1 Many times, I'll take bunches of pictures of hot rods I like at a car show. Too many times, I don't post those pictures cause I never interviewed the owner. It's best for me, and hopefully you the reader to see AND hear why, "My Ride is Me" but if should I hold back the pictures? How many visitors only look at the pictures anyway?? The Other Best Hot Rods from Detroit Best Hot Rod #2 - 1930 Ford Model A Best Hot Rod #3 - Blown Hemi 1929 Model A Best Hot Rod #4 - Big Block 1947 International Pickup Best Hot Rod #5 - Dual Hemi 1956 Ford F100 Want to see more great hot rods? Check out the Hot Rods Page at MyRideisMe.com I do know this is the Crafty B roadster. I met the owner/fabricator/artist in cast aluminum only known as Crafty-B on the floor at Autorama. He seemed super cool and now we're old school Facebook friends, so I'll see if he'll write up a few details about the...
2014 Detroit Autorama Video Wrap-ups from Two-Lane Blacktop
posted by pikesan
Final Looks at the Detroit Autorama Hot Rods Two-Lane Blacktops's put the finishing touches on the 2014 Detroit Autorama with these videos. I wish I could shoot video like this but fact is, I stink at video! Good for all of us to get this final look - and listen - at the great hot rods and customs from Detroit Autorama. First up, Set-up day. I gotta find a way to get to the Big D earlier so I can hear all this! [youtube]http://youtu.be/-vHW5JWOdTU[/youtube] Then, here's another look at the Great 8 Cars contending for the coveted Ridler Award. In case you missed it, my story and pictures from the show are here: 32 Pictures of the 2014 "Great 8" Ridler Contenders This video has an extended interview with the Ridler Award winner JF Launier and lot of info about wild 1964 Custom Buick Riviera. [youtube]http://youtu.be/WEuSJ0jl3-Q[/youtube] If you still can't get enough of Autorama, make sure to go here: 2014 Detroit Autorama stories and pictures. That's all the stories, including pictures from the Basement show in Detroit. Thanks for the...
John Force Racing Between Rounds – Fire in the Hole!
posted by pikesan
John Force Racing Teams at NHRA Arizona Nationals The race only lasts about 4 seconds. Four. Even F1's new engines at 15,000 rpm would only turn over 1000 times in four seconds. But no doubt, these nitro burning mothers make some power! (Click any of these pictures to see them full size) Back at the pits of John Force Racing, it went like this: Race, win, zip back to pits, body off, blink, the blower's on a bench, blink, the clutch is SMOKING next to the car. These guys don't play, so I wanted to show some pictures... You'll have to look closely, but off to the right of the clutch shown here, you'll see some smoke rising up. One of Robert Height's crew members just moved this thing. Wonder if it's cool enough to touch before going back in? This is the mess that goes with the heat of the clutch. It's a beautiful mess when you can rocket from 0 to 100 in under a second! This was the thrash between rounds for Brittany Force's final...

Brittany Force Ready, Set, Race – Beating the Champ and Flip Phones
posted by pikesan
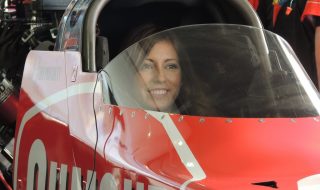
Brittany Force of John Force Racing Team Peaceful. Lucky me, at the Arizona Nationals at Wild Horse Pass Raceway just outside Phoenix (my home track), I was treated to an extended visit with the newest member of the John Force Racing Team - Brittany Force. I shot a few pictures of the crew between rounds (remember Brittany was runner-up at this race!!) and during warm-up time. Believe it or not, this is Brittany right before 8000 horsepower fires behind her. Brittany told me, for warm-up or before a race, "I take a deep breath, trust the team to get ready, then it's my turn to drive and hopefully get a win!" You may be correctly asking yourself... how does she look so good in the middle of a race? It gets better from here!! Just another day at the office, but when it's time to get down to business, the mask goes on and she's the boss: Finally, I ask you, would you look this happy if you'd just lost in your first final round? Well, she's been brought up right...
Getting to Know Leah Pritchett – More Than a Driver
posted by pikesan
I Met Leah Pritchett Driver of Gumout Top Fueler Thank you to Nicole Erickson for the pictures! Thanks to friends from Gumout, I met Leah Pritchett at her pits during the Arizona NHRA race at Wild Horse Pass. Check this out: She's always been daddy's girl at the track She's just the driver NOPE! Both are TOTALLY FALSE! Check it out... Ya know how before you meet someone you start to anticipate what they're like? I guess you'd say it's just guessing, but I just figured I knew a little more about Leah before I arrived... OK. Yes. She's good looking... Better looking in person too and believe this too: Easy to like! Our interview could have been done quicker except for all the friends stopping by to wish her luck. After a disappointing first round loss, I expected Leah to be down. I would be! Losing first round sucks even if it's a, "Run watch-cha brung" Wednesday night at your local track. She wasn't happy, but she took it in stride. Running 15 races this year with the help of Gumout (up from only 12...
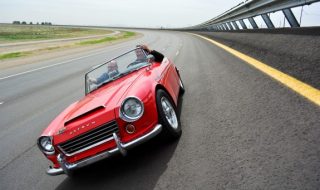
1967 Datsun Roadster Lost and Found for 37,000 Miles
posted by pikesan
Scott Fisher's "Roadster Roadtrip" Visits Nissan's PG If you haven't heard of Scott Fisher and his 37,000+ mile roadtrip in a 1967 Datsun Roadster, then folks... you're missing out. This is not only a great car story, but a great, "human kind" story as well. I had the pleasure of meeting Scott face to face at the Nissan Proving Grounds where I work. (those of you thinking I work on MyRideisMe.com full time, thanks, you're too kind!) It started as, "Clockwise around the country following the seasons" then evolved into a roadtrip where Scott woke up not even knowing where he'd go that day some mornings. Scott said, "The best experiences were the ones I didn't plan..." I love it! Scott made his way to Nissan thanks to Dale Herseth. Dale's Nissan Arizona's resident Datsun freak. He sports the great looking "Datsoon" roadster below as well as a 620 pickup and a B210 as well. Dale reached out to Scott asking if he'd like to visit our proving grounds, meet everyone and have a look at our test facility. Scott realized quickly this is...