3 Easy Ways to Improve Your Car Photography
Written by Jim McIlvaine
Our cars are our pride and joy. We love them, cherish them and in some cases, treat them better than we treat ourselves. Realistically, we know the relationships we have with our beloved machines usually don’t last a lifetime. Our tastes may change or our family obligations may finally win out and we eventually part ways. Still, we’ll always have memories and often photos are a great way to re-live some of those special times.
Unfortunately, our love for our vehicles is often blind. When we look through the viewfinder, all we see is our car and we often overlook some pretty glaring issues that are really detracting from our pride and joy. It doesn’t have to be this way! To help out, here are three easy tips, which will, regardless of what kind of camera you own, help you take better pictures of your ride.
Tip #1: Location, Location, Location
You’ve spent all weekend detailing your car and finally it’s perfect for pictures. Next, you break out your camera and start snapping some shots, right? WRONG! Your car deserves better than that. Take a picture in your driveway and there’s a good chance you’ll be including things like:
- Your messy garage
- Your neighbor’s rusty Toyota
- Maybe the garbage cans sitting at the curb
- Or the pole from your kid’s basketball hoop, sticking out through your trunk.
Is that what you’re looking for? Spend an extra 15 minutes and drive your freshly-waxed ride to a more suitable location. Remember, you’re taking a picture of your car, not a cool statue or a pretty building.
This Mustang was photographed behind a Wal-Mart. Those big box stores are actually good for something besides cheap prices on batteries!
Many of these stores have very clean walls on the backside of their building, with no parking lot stripes, street lights or other clutter to detract from the beauty of your ride. Your shiny paint and sparkling chrome reflect everything around your car, so try to keep that stuff to a minimum.
Also, leave the grassy areas to lawnmowers and livestock. Try not to let any vertical or horizontal lines intersect with your car. These lines could include the horizon, buildings, light poles and trees.
Once you’ve found the right spot, make sure you pick the right time of day. The best times to photograph cars are the hour around sunrise and the hour around sunset, known as “the golden hour.” Without getting too technical, harsh, mid-day sunlight won’t help you get great photos.
Summary for a great location to shoot your ride:
- Don’t use your driveway! Find a clean uncluttered spot
- Watch for excessive, unnecessary reflections, especially when your car’s parked on grass
- Shoot at the “Golden Hour” around sunrise and sunset
Tip #2 Composition:
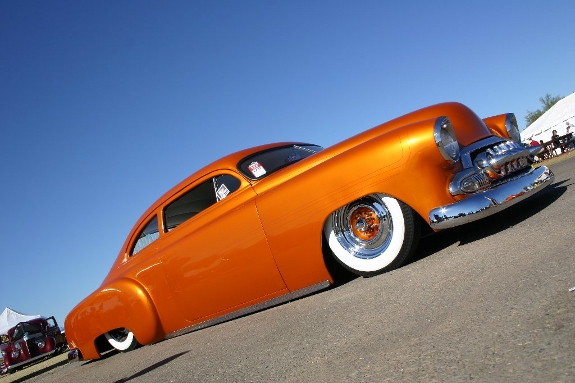 Aggressive camera angles almost always look better than straight/level shots, even if it’s just a slight tilt of the camera. The angle of this picture is right on target and the “rule of thirds” is also in effect. This rule could actually be called the rule of ninths, as the photographer is supposed to imagine two evenly-spaced vertical and horizontal lines in each photo, with the subject generally located in the middle.
The drawbacks of this picture are:
- It was (presumably) taken sometime during the middle of the day, at a car show. That means we see:
- a maroon sedan and tent on one side,
- people eating at picnic tables on the other
- and a whole slew of reflections in the front bumper and paint.
- The horizon line also intersects with the car (see the white tent?)
Get Low: Cars that sit this low should be photographed at an angle that shows off their proximity to the ground. This same picture can be taken behind the Wal-Mart or at the crest of a hill, with much better results.
See All Four Wheels: If you’re down far enough (and your car sits high enough) to see all four wheels, make sure you get all four in the picture. This will help you find the proper angle, which really shows off the shape of your vehicle, regardless of whether you’re looking at the front or back of the car.
Sweat the Little Things: The window of this car is rolled down and there is a car show flier stuck in the sill. Those are the kinds of little details that only take seconds to correct, but can greatly enhance the overall appeal of a picture. Other things to look for include shadows creeping up on the car (see the long shadow by the passenger side door?) or garbage on the ground or any other clutter that might detract from the subject.
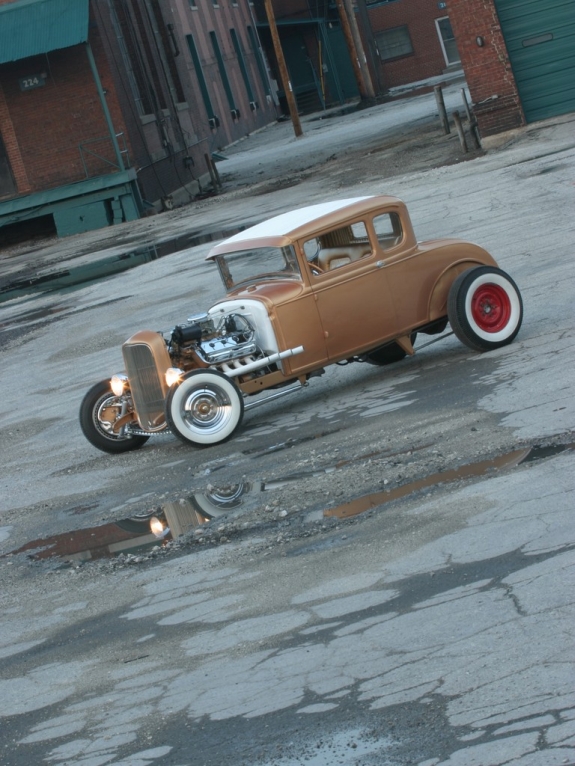
This ’31 Coupe was shot in an industrial park at sunset. The rule of thirds is being applied here, as well as an angle that shows all four wheels and a slight tilt.
Somebody Get the Lights: You’ll also notice the headlights are on. This is an artistic preference, but I always try to use headlights and taillights in my photos, as I think it helps highlight the vehicle. The Mustang shown earlier also has headlights on. The headlight covers darken their effect, but the side markers do make a difference.One notable exception for using headlights is cars like third generation Firebirds and some Corvettes, Porsches and Ferraris, which have pop-up headlights. It’s best to keep those puppies hidden and just use parking lights or emergency flashers instead.
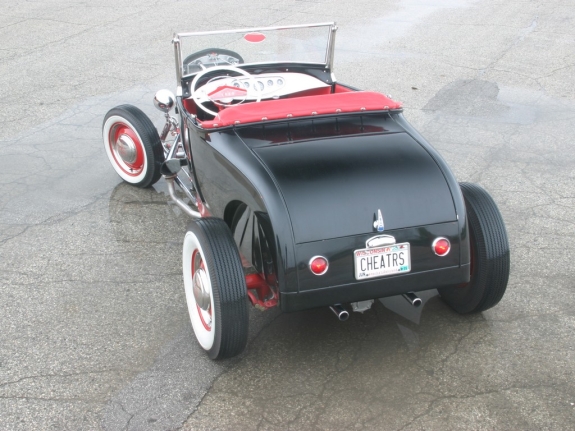 Elevated photos are also an easy way to set your car pictures apart from the herd. Try to avoid shooting straight on, so you can show more of the vehicle’s character. Notice the taillights on this roadster are on and the front wheel is turned toward the camera, to show off the face of the wheel, not the tread of the tire. Because this car is a convertible, we turned the wheel far enough, so that the steering wheel looked level inside the car.
Elevated photos are also a great way to hide junky backgrounds. I stood in the back of my pickup truck to take this picture, which helped hide a bunch of semi trailers. Also, don’t be afraid to move your car to take different pictures. This isn’t crime scene photography and there is no rule that says you cannot move your vehicle to take another picture.
Tip #3 Steady Now!
Flash OFF: One of the most important things to remember is that you should almost always avoid using a flash when photographing your car. The rare exceptions to this rule would include launch shots at the drag strip, but we’re focusing primarily on people taking pictures of their own cars. Whether you have the latest digital SLR or a $90 point and shoot camera, you’ll want to learn how to turn your flash off for car photos.
Tripod Time: Cameras will often compensate for the absence of a flash, with a longer exposure time. If you aren’t using a tripod, this might result in a blurred photograph. Therefore, find a tripod or some way of stabilizing your camera. When I’m photographing cars at ground level, I often set the camera right on the ground, propping up the camera and/or lens at the appropriate angle with my wallet.
I also use the timer function, so I don’t take a chance of shaking the camera by manually pressing the shutter-release button.
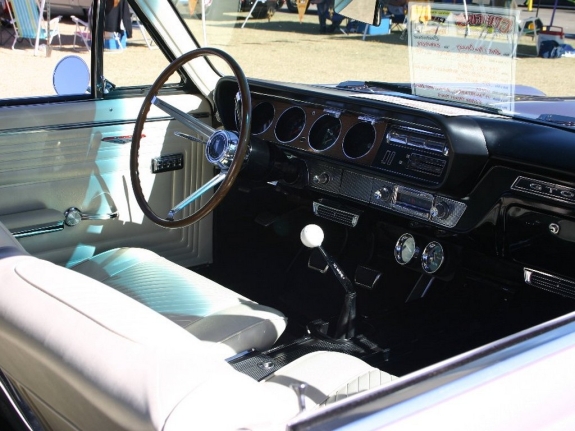
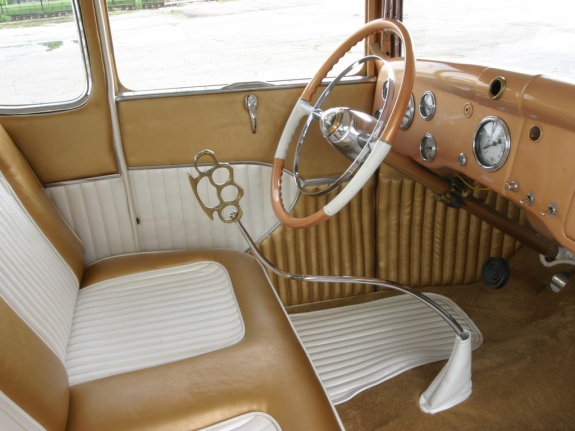
Watch for Shadows: As we mentioned earlier, avoiding peak sunlight hours helps eliminate harsh shadows. These harsh shadows come back in spades if you use a flash. This photograph didn’t have a flash, because the sunlight bouncing off the white interior kept the interior bright enough. You can still see plenty of shadows throughout the interior. Interior pictures that use flashes will often show shadow rings from the steering wheel, shifter or anything else that blocks the flash.
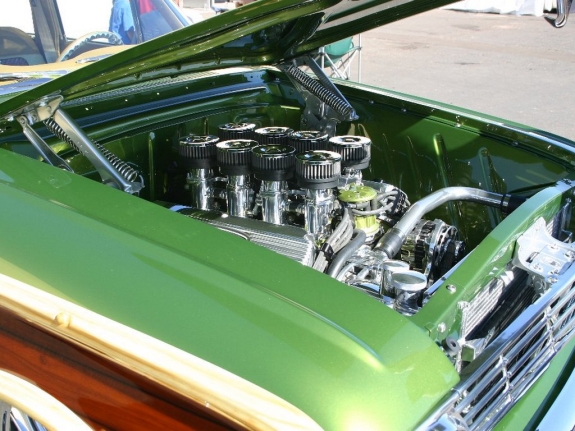
This photo was taken of someone else’s car at a Goodguys show. If this is your car, take the placard off the dashboard and move to a location (and camera angle) that won’t show coolers and lawn chairs in the background.
Find some Shade: If you really want to take pictures of your car during the peak sunlight hours, find a spot in the shade and take pictures of your engine and interior. The shade will protect the interior from harsh contrasts and shadow lines, but the strong daylight will provide enough indirect light to evenly illuminate the interior.
More Important Details: It’s also a good idea to double-check the little details on your interior.
- Make sure your steering wheel is straight.
- Be sure all the movable switches, vents and other doodads are uniformly aligned.
- Check to make sure the carpeting is clean and you don’t have 15 pounds worth of key chains or air fresheners junking up your shot.
- Don’t be afraid to open the door to get a better angle, let more light in or make it easier to position your tripod.
- If you have a convertible top or t-tops, crack ‘em open and let that light in! Just make sure you’re in the shade.
Engine Pictures: Taking pictures of your engine can also be challenging, because you’re photographing a relatively dark area of your car and you’re in the shade. Start by opening the hood as wide as possible, even if it means having someone physically hold the hood up (just make sure they aren’t in the shot). Then, get your tripod set up at an angle that shows as much of the engine as possible.
This is another car show picture and probably the best angle available, without touching someone else’s hood. Since the hood is so low, there’s not much light available and we end up seeing as much fender as we do engine.
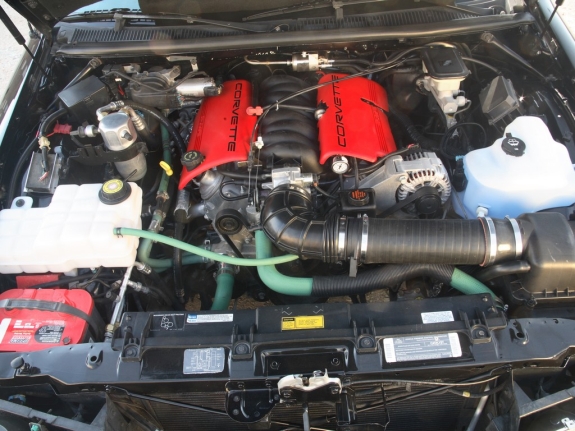
Remember, just because you can stand in front of your engine and take a picture, that doesn’t make it the best possible angle. The camera in this photo sat on a tripod at about seven feet, to make sure the view of the engine wasn’t obstructed and the battery and intake were also visible.
You’re not alone! If you’ve read all this and are starting to feel embarrassed about all the crummy pictures you’ve taken over the years, don’t feel bad. You can go to the newsstand right now and look at cars in magazines that have paint jobs littered with reflections from trees and backgrounds so cluttered with junk, the art department had to photoshop white backgrounds in their place.
Study the Pros: If you would like more ideas on how to take great pictures, check out the magazine work of some real pros. Some of my favorites include Wes Allison, Randy Lorentzen, Johnny Hunkins, Rich Chenet and Rob McGaffin. Remember, practice makes perfect and if you’re using a digital camera, it only costs you battery power!
 The author of this story supports Camp Anokijig, a non-profit youth and family camp, located near Plymouth, Wisconsin. Visit www.anokijig.com for more information.




Nice tips! I learned a lot. :) Cool post!
great tips! Thanks for sharing
Good info. Well written. Thanks!
I’ve just started taking pic’s of autos, belong to the Buick club in north Seattle.
Thanks for info, it was very helpful.
This is one of the best how to articles I have come across. I’ll be putting some of these tricks to the test at the Detroit Autorama.
Great little article. I’ve read it several times now and while I”ve known most of these tips, I still often make some simple mistakes.
Now, how about some tips on photographing models.
Rocket Ron,
That’s a great idea! I’ll try to grab some tips about shooting models from Mitzi at Mitzi and co.
Great tips, we all need some pointers to capture shots within our hobby. There’s nothing worse than getting home and realising you have blurred the picture of your favourite ride. Dreaminghotrods.com from down under has some great ideas from Australia.
That was a terrific article! I photography cars all the time and love learning new tips and tricks. I’ll be sure and apply what you have described here to my next shoot. I have to shoot a new exotic convertible today. I’m very excited. I’ll keep you posted. Thanks again for the info.
I am a car photographer and I admit it’s a great article!!
I like the tips. Only the interior pictures, under the hood pictures, look like a big amateur.. I’m sorry. Partially the info was useful only you make more impression with the right balance between what’s in the car and whats out the car. Too many light spots where detail is lost.
another good way to get a good shot is try messing around with the effects. black and white looks amazing.
Sorry Jacob, had to edit out your link. That wasn’t an amazing picture…