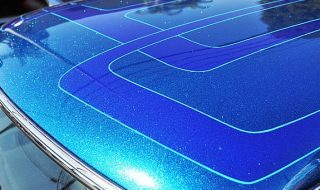
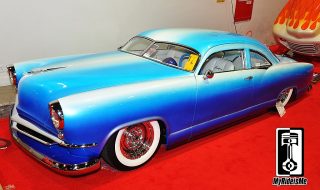
Cheap Paint Guns Still Shoot Metal Flake When I posted my metal flake FAIL I heard from my new friend Chris at Chaotic Customs. He made a great how-to story about creating a custom metal flake roof for your ride. (Picture from my vast photo archive, I have no idea what paint gun was used here or who's ride this is...) Great Chris, but I don't have a $300 paint gun, and guess what, as often as I use one, I doubt I'll spend the money on one since we all have so many toys we want. (plus, as my friends would attest, I'm a tight-ass!) Challenge accepted! (and then some) Chris came through with a how-to video for shooting metal flake and he used a cheap Harbor Freight gun! I hope we can all afford $30-40 for a gun and if you watch, Harbor Freight has 20% coupons available almost all the time. Chris also shows a few more details about setting up the gun and what he literally throws away when using the HF gun. It's a fun video with great commentary... Thanks a million...
Talk to an Expert: Tips on How-to Metal Flake
posted by pikesan
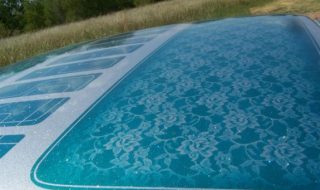
Chaotic Customs shows us how Metal Flake's done! The internet can be a great source of info, and if you're lucky, you'll find some good friends generous enough to help make a giant metal flake FAIL a big win. I got this email: Hi, my name is Chris Carlson and I own Chaotic Customs. I saw your metal flake fail on Royboy Productions FB page and thought I'd give you my two cents. Painters have a few tricks up their sleeves to make it look easy. I've attached pictures of the 1965 Thunderbird we're building for the girls here at Chaotic. The roof is flaked, panel painted and laced. Hope this helps you out! Shooting metal flake and getting the flake to sparkle and dance does take practice. However, I’m willing to let you in on a few tried and true custom painting tricks! First off, spray a base color that has coarse metallic in the paint. For the flake, you need two guns, this makes it so much easier for the layering process! Unless you are using Monster Flake, you can use a...
Be Flakey, Be Happy – Custom Painted Flake Roofizzes
posted by pikesan
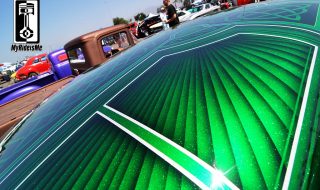
More Favorite Flake Roof Photography (Click on any photo to see it full size) The LA Roadster Show's about as good as it gets for finding customs and hot rods. Nobody argues that SOCAL was where it all started. Among all the cool rides Brian (from problemchildkustoms.com) and I saw at the 2013 event, we collected just a few of our favorite "Flaked Roof" examples to continue on what's been a popular story: Metal Flake Roof Dazzling Photos. So here goes... Which one's your favorite? Turns out this is Eric Conner's custom 1950 Chevy Deluxe. I shot Eric's old truck at night and was really happy with how it turned out: Night Shots - Long Exposure (no, I'm not stalking him... The Fellas Socal are doing it right! Bo Swan's a Fellas too.) I guess I'll close with this shot. This all black sedan had a crazy rainbow flaked roof. I shot the palm trees, then turned the photo around 180 so the trees weren't growing out of the sky. Kinda like this one, so I...

Metal Flake How-to Complete FAIL
posted by pikesan
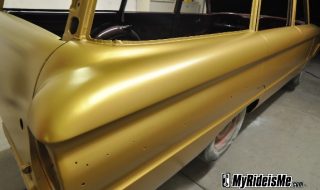
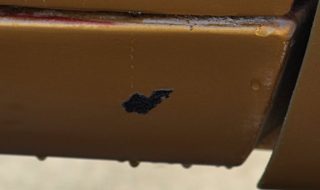
My Friend Made it Look Easy! Custom Metal Flake Looking for help with: How to setup a Harbor Freight paint gun for shooting flake. Please email me. At car shows, especially the good ones in California, you'll see some stellar custom metal flake paint... like the shot below from the NorCal Knockout, the custom paint of all types is well represented. See some amazing examples in this story: Custom Metal Flake Paint After observing, and of course digging the look and appreciating the skill, I wanted to try it for myself. Then, my buddy Joel helped me customize a severely worn out plastic trim piece for my 1963 Falcon Wagon. Here's that piece: I watched Joel do it, looked easy. Soooo... I tried it myself. Step 1: Base coat of gold Step 2: FAIL! So let's hear it... what'd I do wrong? Anyone willing to show me how it's done in a good story with a few pictures, please get in touch: Email pikesan I'm especially looking for stories about how to set-up a gun for spraying flake, and something like,...
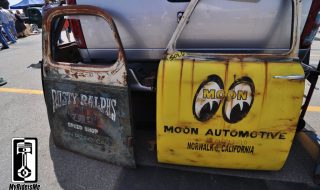
One-of-a-kind Custom Painted Shop Truck Doors
posted by pikesan
Hot Rod Art: Hand Painted and Lettered Old Truck Doors As soon as we stepped into the swap meet at the 2013 LA Roadster Show, we found Gary Crisp and his custom painted doors. In a time where patina is IN and faking patina is about a common as the real stuff, Gary’s work is tough to beat! Who knows what condition the doors were in when he got them, let’s figure they were rough… but the end product is outstanding! The lettering and art, even up close, look to be good’n old. Gary’s a custom painter by trade. Mostly hot rods and bikes from what he told me, but now he’s just having fun painting doors. As you can see, he’s fairly successful at it with a few of the doors already marked as “sold” and I heard an order for one happening as I waited to say hi. Get your own custom doors by reaching Gary by email. He’s a little old school when it comes to computers, so give him a few days to respond. Thanks Gary!...
SEMA 2012 – Cool Rides #4 – Custom Paint
posted by pikesan
Traditional to Wild Custom Paint at SEMA 2012 (Click to see any picture full size) Click for everything @ 2012 SEMA Show from MyRideisMe The SEMA Show's all about custom. One thing there's never a shortage of is custom paint. Pictured about is my buddy Keith Charvonia's 1951 Kaiser. I already posted about it here, The New Sick: 1951 Kaiser Kustom and Speedhunters.com took some pretty amazing pictures here: Drag'n Kaiser. In case you didn't read either of those, this "fade" paint job was applied by customizing legend Gene Winfield. The lights of SEMA, outlined by the casino-like red carpet set off the paint, but to really love it, you have to see it in the sun! Stepping up or maybe to the side... with some custom airbrush work: Wow! Everyone's seen skulls painted on just about everything, but here's a new take! In view here is the Terminator skull, a Japanese devil call "Oni", the gas mask dude, barely visible, the viking skull, bird skull and Friday the 13th skull! It's all laid out on a pale blue flame-like background. The other side's just as impressive. Here on the...
SEMA 2012 – Cool Rides #3 – No Paint Custom Caddy
posted by pikesan
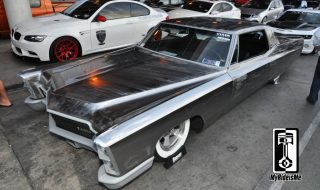
1968 Cadillac Coupe de Ville at SEMA 2012 (Click to see any picture full size) Click for everything @ 2012 SEMA Show from MyRideisMe Ever heard the saying, "A postman doesn't go for a walk on his day off"? Well, the owner of this 1968 Cadillac Coupe de Ville, Tim Johnson, is a painter by trade. Tim's Caddy is a three year build. The long road to SEMA started in early 2010 when his soon-to-be wife Jacquelyn (he wisely married her 2 year ago) picked it up for him as a gift. He's been driving it for the last couple years, dodging (unsuccessfully) rain, puddles, sprinklers and every other kind of moisture due to the bare metal finish. With so many thumbs up for the swirly finish, and cause the Caddy was in such good shape to start with... Finally, just two weeks before SEMA, Tim decided to clean it up one last time to leave it metal with clear. I'm glad he did. Don't mistake this for any "Rat Rod"... The interior's finished and tight, stitched up by his buddy Eric Hunsaker over at Advanced Mobile Electronics in Las...
Custom Paint Jobs – Metal Flake Roof Dazzling Photos
posted by pikesan
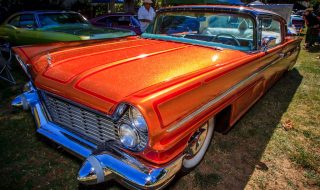
Custom Cars with Custom Paint - Favorite Flake Roof Photography (Click on any photo to see it full size) I've been meaning to write a post on custom paint and especially the amazing custom paint you'll find on lowriders and customs, especially in NorCal. With the great customs piling in at the NorCal Knockout, I finally got the shots I wanted. Lend a hand! If you know these cars, and more importantly, who the painter is... please leave a comment (you don't have to register or anything) and I'll add the info to this story. There's nothing I'd like to do more than give credit to these painters. Fantastic work! This is the roof of the 1959 Lincoln (pretty sure on the year) shown above. Rainbow flake with lace and darker flake fade. This car was a show stopper and won best of show. I know this was the roof of a 62 or so Ford Thunderbird. You've got it all here! Lace, multi colors of metal flake including rainbow flake and silver metal flake. There's even some flames... I'm running out of ways to say, Unbelievably cool. You'd...

Get’n Buffed – My Falcon Wagon Gets a Shine-on
posted by pikesan
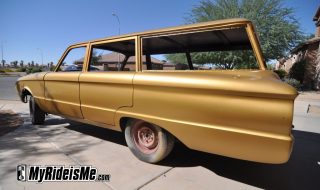
Ford Falcon Wagon - Get'n Buffed Crushed. Stopped dead and pissed. That's how I'd describe myself following my first paint attempt on my 1963 Falcon Wagon. The After shot of the inner quarter panel. How should I feel? The bodywork sucked, there were foo-boos all over the place from a careless painter who's been cheating everyone he meets since. But... that angry tone and deflated project is almost completely back on track now! My wagon's got a new coat of flat gold paint and the interior paint's almost completely fixed thanks to my buddies at Infinite Detail. I first met Jeff from Infinite cause he joined MyRideisMe.com and uploaded some pictures of his 1960 Falcon Wagon. I contact him and cried on his should some about the sorry state of my Falcon's paint. He showed me his website and the "before and after" pictures and said, "Let me take a look." Soon after, Jeff and his brother-in-law Mike were over. They took a long look, then explained in great detail what they could and couldn't do and offered a written quote. That kind of honesty and...
Falcon Wagon Paint – This Time with Flat Clear
posted by pikesan
Flat Paint Job for my Ford Falcon Wagon Finally. I don't think I could have taken a longer path to get there, but at least it's done. My Falcon's wearing new paint and the flat sheen or "hot rod flat" I was going for came out great. Special thanks to T.C. at FinishMaster in Mesa, AZ for help with the paint and advice to make this happen. I also took advantage of advice from Kevin Tetz from "Trucks" TV show. Kevin helped me with 11 Tips for a Flat Paint Job and sorta held my hand on this project. It's a long story how I got here, you can read it all at this link: Falcon Wagon Build. It started with bodywork lessons and primer from Squeeg's Kustoms then a paint job gone wrong. Back on track, here's how my buddy Joel and I laid on this flat gold paint. I think it came out great! Before Paint Prep: You can see here what my wagon looked like right before we started on Saturday morning. Over Labor Day, my sons and I scuffed the clearcoat...
11 Tips for Flat Paint Jobs with Flat Clear
posted by pikesan
Flat Clear Coat Spray Paint from Kevin Tetz of "Trucks" 1963 Ford Falcon Wagon with a Flat Clear Coat Spray Paint Job. Every story I've written about this build can be found here: 1963 Ford Falcon Wagon Build It's painted! In case you're just tuning in, I've been trying to put my 1963 Ford Falcon wagon back together for oh... 3 yeas now. It was supposed to be a quick-turn project that resulted in a cool daily driver. That didn't happen. We did have a great Overhaulin-style tear down party that left me with a shell of a Falcon. After a total failure with my first paint job (a long boring story I won't revisit) I had to repaint my wagon, but this time, I wanted a flat paint job using flat clear. There's a bunch of forum-based info on painting with Hot Rod Flatz or using flat clear, but I wanted a trusted source with 30 years of painting experience. That's where Kevin Tetz from the Power Block show "Trucks" comes in. I met Kevin at SEMA a few years ago, and just like you'd suspect, he's...
Phoenix Custom Auto Paint Tradgedy – My Falcon Wagon
posted by pikesan
Paint Review - Phoenix Custom Paint Shop to Avoid! You're not looking at an artistic interpretation of the state of West Virginia, you're looking at the terrible paint work by a company in Phoenix, Arizona called "Terrific Paint and Customs". When you start a project, one of the biggest things you need to decide is a budget. Because my four-door, Ford Falcon wagon was never going to be a high-dollar car, no matter what I did to it, I didn't want to spend a fortune on paint. I did want something shiny that I could be proud of, but I knew that getting a great paint job, or "Show Quality" was not in my budget. That's when I started looking for a "driver" quality paint shop. I found a Craigslist ad and gave the guy a call. He sounded cool enough, knowledgeable, and his ad said, "15 year experience". I sent a bunch of pictures of my Falcon, we talked and sent way too many texts about all the things I wanted to do and he said $1800 and it'd be done in about 3 weeks. (keep that in...