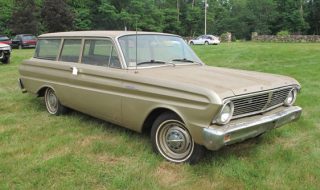
Ford Falcon 2 Door Wagon - Can you see the vision? See it? No? Fine, I'll help with your future hot rod vision... What do you see? Junky old Falcon wagon? That's it? Notice it's a 2 door? That's much more desirable to most... what else? It's very straight, I can't see any cancerous rust from 6 feet away. Anything else? Yea! It's complete! From this pic, this would be a car I'd like to see and know more about. And you can! This low mileage dreamer is for sale Sept 21-22 by Auctions America at their Bennett Collection Auction in Rollinsford, NH. I imagine that we've still got a few non-believers. Fine... take this! Same car, I think it's even the same color. The only difference (you can't see) is this one's an original V8 car. But look how plain this baby is! No side trim at all, just like the un-optioned beauty in the first picture. I wrote about this Falcon and called the story: When Bone Stock Marries Plain Jane - it's a completely, and near perfectly, restored 1965 Falcon wagon done by a chrome restoration specialist...
1960 Starliner Part 2 – It’s Custom and Evil
posted by pikesan
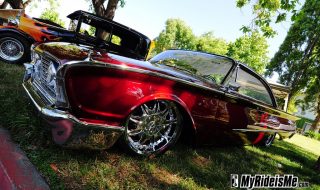
If you've read MyRideisMe.com long, you know we don't do many stockers, but the unrestored and original 1960 Starliner from part 1 was special. Contrast that with the billet-wheeled'n candy painted sweetheart you see here. Or is it? I met Mel and Lynda Swafford at the NorCal Knockout in Vallejo, CA. From the pics you can see it was a cool show nestled in the trees of the Solano County Fairgrounds. As the first annual, it wasn't that big, but everyone who showed enjoyed a perfect California July day. (Look for Nick K and my pics soon...) Back to this "sweetheart" known to the Swafford's and their friends as, "Christine". Oh you remember! Stephen King's 1958 Plymouth Fury that didn't mind running folks off the road... It's not a nickname you give to a car that's been nice during a rebuild. (Are they ever nice?) It all started well. Mel's dad owned a white 1960 Starliner way-back-when and Mel, "Always loved it." It's often a special memory a car brings back that make it, "My Ride is Me." To get started, in about 2006, Mel traveled to Denver to...
1960 Starliner Part 1 – Low Mile Stocker
posted by pikesan
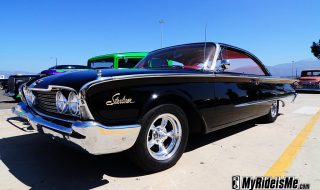
When you're cruzin' the LA Roadster show, you never know what you'll find. Roadsters, yea, but like I've said before, the LA Roadsters brings out the best in all of SoCal. Here's one of the best you'll see anywhere from Rod Barrett of Rancho Dominguez, CA. This original and unrestored 1960 Galaxie Starliner has a little over 10,000 miles on the odo. This is part 1 of 2 Ford Starliners found this summer, but maybe there was a part ZERO? KIRK! from Billetproof and now Goodguys Gazette fame has (had, he sold it now) one of the finest 60 Starliners ever built. If you've never seen it, check it out in Kirk's garage here. So much has been written about Kirk's ride, I'm skipping to this bad black beauty. One thing 60 Starliner folks are happy to tell you is that they own the longest and widest Ford ever built. At 5.7 inches longer and five inches wider than the 1959 Ford, they're still shorties compared to the 1959-60 Caddy coming in at 213.7 inches compared to the Cad's 225. Looking around the web, I found numerous mentions of...
Galaxie Custom and Bonneville Salt Cruiser
posted by Hechtspeed
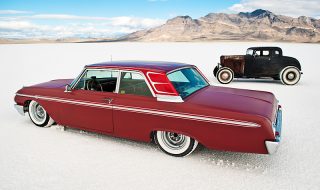
This 1962 Ford Galaxie 500 was easily one of my top 3 favorite cars from Speedweek 2009. I first noticed it in the pits then saw it again while Pikesan and I were cruising down the Long Course after the drivers meeting. We sort of cruised the rest of the Long Course along side Nick and his Gal' then turned onto the Return Road back to the pits. Almost 7 miles from the start, we spied some pristine, undisturbed virgin salt and decided to make a detour for some salt-throwin' pictures Craig's '27 T, Nick's Galaxie and Nick's buddy's 5 window Coupe you see in this picture above. Here's some more shots of this Mild Custom! I love this car! That red satin paint against the bright white salt is rockin'. I dig the long lines. That stance is perfect with its Air Ride Technologies 4-way system with electronic controller. I dig this shot with Pikesan's roadster in the background. From Nick: "This car has been a great driver for the past 4-1/2 years. It originally had a 390/auto and I decided to swap in a 302/T-5 and 3.70...
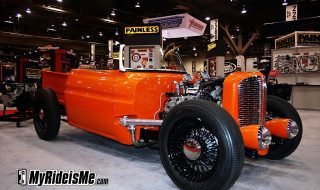
1 Painless Way to a Roadster Pickup
posted by pikesan
At SEMA, it's easy to find a great car, they're in almost every booth! But like the 70 Chevelle with a Duramax diesel motor, it's a the different and sometimes unique builds that really get my attention. That's what I found in this "Painless" Roadster Pickup. This style of roadster pickup, also called a "Truckster" was penned by well known hot rod artist Thom Taylor back in August of 2007 for Rod and Custom Magazine. The concept is simple, but you're gonna get to know a sawzall and grinder real, REAL well to get it done. You take 50-70's pickup, then chop up the cab and the bed until proportions of a hot rod. Easy for Thom to say! I saw a Thom Taylor sketch in the pickup bed of this truck, so I'm sure he had a hand in the proportions, color and stance that make this truck one of my favorites from SEMA. So what is it? It started as a 1978 Ford Pickup. Recognize it? From there, the cab was narrowed 16 inches, then the top and A-pillars were chopped off and the remaining cab shortened...
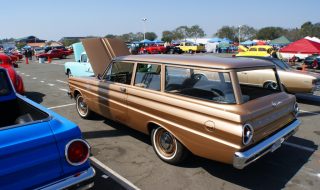
Bone Stock Marries Plain Jane: Falcon Wagon
posted by pikesan
All right then, I'm a wagon freak. You could even say I'm a Ford Falcon wagon freak. I've written before about the problems I have (Extra W Chromosome) and the 63 Falcon wagon project I'm re-doing. I've learned to live with those issues and I'm doing my best in the hot rod society. But then I saw this totally clean 1965 Falcon wagon owned by Norm Huie of San Clemente, CA at the Cruisin for a Cure Show. More precisely, it's a '65 Ford Falcon 2 door wagon in the original Prairie Bronze paint. It'd get boring if I kept saying original since Norm's taken great pains to restore his wagon back to 99% stock himself. Norm's always been into Falcons but chose this odd-ball 65 because it was the last year of this model. I say odd because it's a 2 door, no-doubt more desirable than the mor-door cousin I own. Then, it's got the factory V8 another plus, but from there, this car is plain-jane! It's a non-Deluxe, non-anything car but it does have power steering and power brakes and a rare cargo light inside near the...
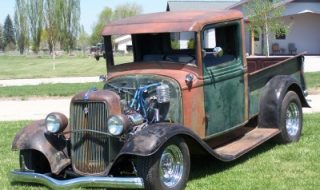
Scopin’ Out Ken Scobies 1934 Ford
posted by GreaseGirl
It was an early morning wandering around the quaint streets of Stevensville, Montana. The last thing I expected to see was a slammin' 1934 Ford Hot Rod Pickup. If it wasn't for my own pre-morning-coffee-haze I would've gone into the Full Moon Saloon and inquired who the owner was. Lucky for me (and you) that I ran into this pretty truck along with its owner Ken Scobie, once more that evening at the Stevensville Summer Picnic & Car Show. With 2 trophies under its belt in a mere 4 weeks since being completed, this truck is worth giving a peek. Its been built from the frame up by Ken Scobie, a San Diego native that migrated on up to Montana 35 years ago while still working as mechanic. He's since retired, and at the age of 69 says "For a poor kid growing up in the days of cool rods it has always been a dream of mine to build a rod in the old school style." Build a rod he did! "Finding this beauty was the real treat. She was in Helena, Montana behind a house out in...

How-To: Bullitt Gas Cap On A Late Model Mustang
posted by Hechtspeed
Leave a comment below... Why should you win? That's all there is to it! Want to add a little "Frank Bullitt" style to your late model Mustang? AmericanMuscle has just the accessory for you! The slick looking aluminum Bullitt gas cap is the first modification you need before you start jumping your 'stang on the streets of San Fran' a la Steve McQueen. MyRideisMe.com provides the installation guide of a Bullitt gas cap on a 1994 Dark Green Mustang GT (McQueen would dig it!). The Mustang you see here might look subtle but it packs a punch at the dragstrip, with its horseman banging the gears to a best of 12.85 @ 106mph on 8" slicks and stock motor and cam. This Bullitt gas cap will let those Camaros know this is no ordinary pony. Follow along as we take you through the installation. It's very straight forward and can be done by a novice with simple hand tools in about 30-45 minutes. Step 1: Open the box and make sure everything is accounted for and in good shape (nuts, studs, lock nuts, washers, magnets, cap and ring). AmericanMuscle is pretty good about getting you a good...
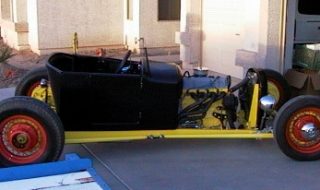
3 Steps to Personalizing your Hot Rod
posted by pikesan
I've always liked my car... Good thing, right? I guess I always wanted a hot rod. Bonnie, as in Bonneville, sure has changed since I bought her at a Goodguys show. The 3 pictures shown here are the 3 evolutionary changes of the car. Step 1: As I bought her: I was thinking of buying a Zipper bodied Lakes Modified until I found out there's a 6 month wait to get one. I felt pretty lucky to grab this when I did. You'll see the long split wishbones hooked to a 3 inch dropped axle. The rear axle is a old school banjo. The wheels are the 1935 style wires with some hard as hell bias ply or tractor style tires. I'm not sure what kind of paint the original owner used, but that yellow is tough as NAILS!! The engine block hasn't never changed, but it did get updated. I've got the original header on it too. The quarter elliptical spring suspension front and back is there, but there's friction shocks (only better then nothing at all!) in the front and nothing in the rear. Step 2: My...

Falcon Build Update #4 Tailgate Drama
posted by pikesan
Ford Falcon Wagon Tailgate I should have called this "The Good, The Bad and the Ugly" as I update everyone on the MyRideisMe.com 1963 Falcon Wagon build. It no doubt I drastically underestimated the work needed to get ready for paint! Also, my plan for the Falcon changed from a quick paint job to, "I might as well do it right" which of course is the right way to go. I've made some good progress on the body work even though Arizona's held 100-plus degrees making it damn hot in the garage. It'll be another 20 days before it cools down, so waiting's not an option. Damn! I'm writing about the weather! Want the good, the bad or the ugly? OK, bad first. Remember the blog when I showed off my skills filling the back-up lights in the tailgate. Please disregard everything I said! I screwed up that tailgate beyond reasonable repair, at least for me. Luckily, I have Mr. Freeze, (my buddy Rob) backing me up with another tailgate on hand (and rust free!). The original tailgate was repaired (another big pile of manure the...
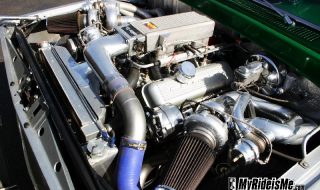
1963 F-100 Twin Turbo Video
posted by pikesan
My Ride is Me had a busy weekend! NO! I didn't hang out with my mom! I went to my friend Steve Szymanski's shop called Industrial Chassis Inc. and got this ultra cool video of what has been transformed from a really nice truck to a full-on Big block Chevy - twin turbo -1000HP badass! I'm doing a full story on this car soon, but for now, here's the video: Here's a sneak peak under the hood too! That's a 427! Fuel injected, custom headers, you name it, this thing is done right. Much more later... Take a look at Steve's Garage (Click HERE) and see what else he's up to. I have a bunch more pics to show and a profile of Industrial Chassis coming up. What do you think? Wicked! (your comments are...
FORD AND NHRA TEAM UP ON SAFETY
posted by pikesan
You'll never guess who's a new member at Ford's media site? MyRideisMe! We'll keep an eye on what's happening with the performance cars and racing action over at the Ford site and post it here so you won't have to look around. This first story hits close to home for me. When Eric Medlen died I had trouble watching drag racing. I've always liked John Force so I cheered for his teammates as well. Eric just seemed like a good guy from watching him in interviews too. That whole incident hit me hard.The John Force Racing team reaction was over the top. They've re-examined EVERYTHING about safety in their funny cars and is doing the right thing by sharing all of the data with the NHRA and the other racing teams. The latest step is illustrated in this story from Ford Media. At Force's request (I'll bet) Ford's doing the in depth engineering study needed to make sure these 7000 HP monsters are as safe as they can be. Great work guys! Courtesy of Ford's Media: DEARBORN, Mich. – Accelerating safety development in the sport of drag racing, the...