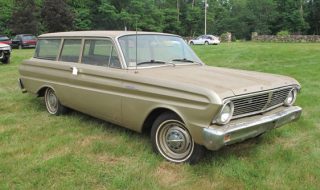
Ford Falcon 2 Door Wagon - Can you see the vision? See it? No? Fine, I'll help with your future hot rod vision... What do you see? Junky old Falcon wagon? That's it? Notice it's a 2 door? That's much more desirable to most... what else? It's very straight, I can't see any cancerous rust from 6 feet away. Anything else? Yea! It's complete! From this pic, this would be a car I'd like to see and know more about. And you can! This low mileage dreamer is for sale Sept 21-22 by Auctions America at their Bennett Collection Auction in Rollinsford, NH. I imagine that we've still got a few non-believers. Fine... take this! Same car, I think it's even the same color. The only difference (you can't see) is this one's an original V8 car. But look how plain this baby is! No side trim at all, just like the un-optioned beauty in the first picture. I wrote about this Falcon and called the story: When Bone Stock Marries Plain Jane - it's a completely, and near perfectly, restored 1965 Falcon wagon done by a chrome restoration specialist...

Get’n Buffed – My Falcon Wagon Gets a Shine-on
posted by pikesan
Ford Falcon Wagon - Get'n Buffed Crushed. Stopped dead and pissed. That's how I'd describe myself following my first paint attempt on my 1963 Falcon Wagon. The After shot of the inner quarter panel. How should I feel? The bodywork sucked, there were foo-boos all over the place from a careless painter who's been cheating everyone he meets since. But... that angry tone and deflated project is almost completely back on track now! My wagon's got a new coat of flat gold paint and the interior paint's almost completely fixed thanks to my buddies at Infinite Detail. I first met Jeff from Infinite cause he joined MyRideisMe.com and uploaded some pictures of his 1960 Falcon Wagon. I contact him and cried on his should some about the sorry state of my Falcon's paint. He showed me his website and the "before and after" pictures and said, "Let me take a look." Soon after, Jeff and his brother-in-law Mike were over. They took a long look, then explained in great detail what they could and couldn't do and offered a written quote. That kind of honesty and...
Falcon Wagon Paint – This Time with Flat Clear
posted by pikesan
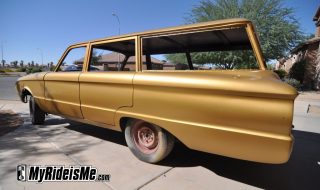
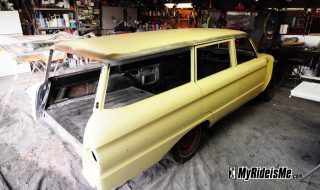
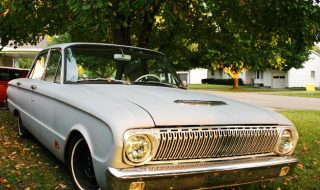
Flat Paint Job for my Ford Falcon Wagon Finally. I don't think I could have taken a longer path to get there, but at least it's done. My Falcon's wearing new paint and the flat sheen or "hot rod flat" I was going for came out great. Special thanks to T.C. at FinishMaster in Mesa, AZ for help with the paint and advice to make this happen. I also took advantage of advice from Kevin Tetz from "Trucks" TV show. Kevin helped me with 11 Tips for a Flat Paint Job and sorta held my hand on this project. It's a long story how I got here, you can read it all at this link: Falcon Wagon Build. It started with bodywork lessons and primer from Squeeg's Kustoms then a paint job gone wrong. Back on track, here's how my buddy Joel and I laid on this flat gold paint. I think it came out great! Before Paint Prep: You can see here what my wagon looked like right before we started on Saturday morning. Over Labor Day, my sons and I scuffed the clearcoat...
RHD Falcon Squire Wagon Groovy Video
posted by pikesan
1963 Ford Falcon Squire Wagon Images Courtesy of Daniel De Silva In case you didn't know, Ford Falcons were made and sold in Australia while the "compact" Ford was selling in the USA too. The cool old Ford Falcons we enjoyed all through the 60's were replaced with some 70s Falcons that looked like... cars from the 70s. In a word, YUCK. But that's another story... Daniel De Silva of Bandit Films has teamed up with Luke from Fuel Magazine to make Fueltank.tv. It's a collection of great hot rod and custom car videos all done in HD. I've watched a few, especially this trick Falcon wagon, and I'll be back! Dig the groovy sounds and especially dig this gorgeous right hand drive Falcon. I want it!! Hopefully my 63 Falcon Wagon Project will turn out half as nice! [vimeo]http://vimeo.com/20471414[/vimeo] For more Falcon fun, check out Pikesan's project: 1963 Ford Falcon Wagon Build...
Falcon Wagon Paint – Gold on the Long Roof
posted by pikesan
My Ford Falcon Wagon's Finally Got Paint It's been a long journey. I'm rebuilding/restoring/modifying (choose what you like) my 1963 Falcon Wagon. I'm way over due on what's been done, but here's where it is now: Shown with premium primer from Squeeg's Kustoms (Squeeg's is a TOP QUALITY paint shop, not to be confused with the painter mentioned later) OK, fine, the car's been sitting around way too much waiting for me to get off my butt. I'm kinda off now, but not completely. Thanks to buddies here in town helping me "get off the computer!" and back into the garage... there's been some progress. So I have one question: Do you like GOLD? It looks great in the sun here, but I would NOT recommend this painter. Terrific Paint and Customs, a Phoenix, AZ custom painter and body shop. The great thing about MY Ride is Me is that I don't really care all that much if you like it. I've been working with a Phoenix, AZ painter that specializes in affordable paint. The idea was to get a...
Cal Custom Spider Caps for my Falcon Wagon
posted by pikesan
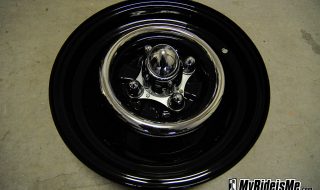
Ford Falcon Wagon Wheels Choice It's been a long journey. I'm rebuilding/restoring/modifying (choose what you like) my 1963 Falcon Wagon. I'm way over due on what's been done, but here's where it is now: OK, fine, the car's been sitting around way too much waiting for me to get off my butt. I'm kinda off now, but not completely. Thanks to buddies here in town helping me "get off the computer!" and back into the garage there's been some progress. All that'll have to wait. For now, I just wanna ask a question. Which cap? At the LA Roadster Show, I found the Cal Custom spider caps on the left along with some Cal Custom trim rings, both still in the original, well worn box. Do you know the ones that fit on the inner ring of the wheel where a dog dish hubcap would fit? I've heard them called "Toby Rings" since a guy named Toby was the first to run'm. I don't know... I later found the two-legged spinner caps on the right, also from Cal Custom on Ebay. Both of these...
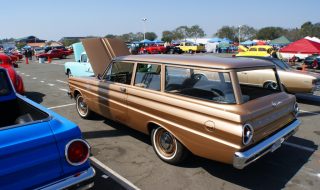
Bone Stock Marries Plain Jane: Falcon Wagon
posted by pikesan
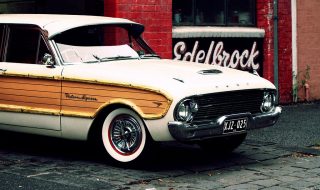
All right then, I'm a wagon freak. You could even say I'm a Ford Falcon wagon freak. I've written before about the problems I have (Extra W Chromosome) and the 63 Falcon wagon project I'm re-doing. I've learned to live with those issues and I'm doing my best in the hot rod society. But then I saw this totally clean 1965 Falcon wagon owned by Norm Huie of San Clemente, CA at the Cruisin for a Cure Show. More precisely, it's a '65 Ford Falcon 2 door wagon in the original Prairie Bronze paint. It'd get boring if I kept saying original since Norm's taken great pains to restore his wagon back to 99% stock himself. Norm's always been into Falcons but chose this odd-ball 65 because it was the last year of this model. I say odd because it's a 2 door, no-doubt more desirable than the mor-door cousin I own. Then, it's got the factory V8 another plus, but from there, this car is plain-jane! It's a non-Deluxe, non-anything car but it does have power steering and power brakes and a rare cargo light inside near the...

Falcon Build Update #4 Tailgate Drama
posted by pikesan
Ford Falcon Wagon Tailgate I should have called this "The Good, The Bad and the Ugly" as I update everyone on the MyRideisMe.com 1963 Falcon Wagon build. It no doubt I drastically underestimated the work needed to get ready for paint! Also, my plan for the Falcon changed from a quick paint job to, "I might as well do it right" which of course is the right way to go. I've made some good progress on the body work even though Arizona's held 100-plus degrees making it damn hot in the garage. It'll be another 20 days before it cools down, so waiting's not an option. Damn! I'm writing about the weather! Want the good, the bad or the ugly? OK, bad first. Remember the blog when I showed off my skills filling the back-up lights in the tailgate. Please disregard everything I said! I screwed up that tailgate beyond reasonable repair, at least for me. Luckily, I have Mr. Freeze, (my buddy Rob) backing me up with another tailgate on hand (and rust free!). The original tailgate was repaired (another big pile of manure the...
Ford Falcon MANIA!
posted by pikesan
Ford Falcon: Sedans, Wagons, Rancheros and Convertibles: I've wanted to write a few blogs for a while. One of them is about the cool Falcons at MyRideisMe.com already. I take a personal interest since I've got one of them even though it might be for sale before too long. You know what they say about having too many projects... I know, you can never, but in this case, I might punt so I can do some work on my Rambler Wagon. So, if you're a fellow Falcon Fanatic, (Craig's about to be clever) a Bird of Prey Beholder or Carnivorous Bird Custodian, dig these rides. First is the 62 mor-dor from garvinzoom. This car is rolling proof that a 4 door can be cool and that high-def Coolosity you doesn't have to break the bank. The original 170 inline six and two speed auto ride in the factory but lowered chassis with 13" skinny whites on blacksteel rims. The body has primer with the trim holes filled, reverse lights shaved and fuel cap moved inside trunk. The interiors a self described "Crappy but clean". The next Falcon is the...