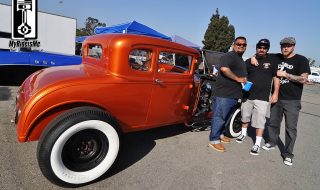
Get $2500 from Gumout for your Hot Rod Project Are you working on a hot rod project? Maybe your project is stalled? Is it taking too long (that's me!) or you haven't even started yet? Don't worry! Make it fun, and take advantage of Gumout's offer to help out with $2500! To inspire or maybe just give ya the friendly kick in the pants you need to get started, I wanted to tell a couple stories about successful hot rod projects and one slick Chevy truck getting dropped and bagged in one day. First look above... you see Victor, closest to his home built Model A hot rod coupe, standing with Jim and Chris. I know Vic's a hard worker and talented building just about anything he sets out to make for himself or his Throttle Kings Car Club buddies. I met Vic when his hot rod was just getting started: Vic enjoyed this hot rod coupe as much as anyone could with multiple trips to Viva Las Vegas Car Show and LA Roadster Show visits. Maybe that's the trick to long term project...
Building the Baddest 1964 C10 Custom Truck
posted by pikesan
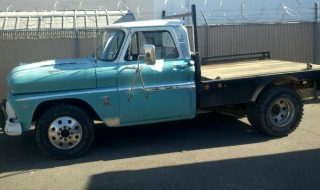
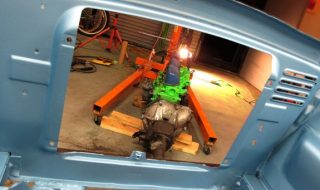
1964 Chevy C10 Dually - Dino's Dually Build Here's what it started as! (Skip to see the Finished Truck! 29 Additional Photos) I'll let Dino tell the story of this build. When it's done, you'll agree, this is the baddest C10 Dually ever. "I found this truck on craiglist and watched it for a few months and finally pulled the trigger. After helping my friend dbomb on his short bed, it got me fiending for another project. This 1964 C10 dually work truck was a friend of mine's that he drove for 30 years in the appliance install biz. He sold it a few years back and it just resurfaced. My plans are to bag it with a pancake front cross member, Nate built me some arms for it and a center trailing arm support and a huge notch for the rear with the p/b hinges. I'll also install a big back window. The truck came with a new 350 crate motor and a turbo 400. I've been gathering parts for a week or so and have almost every thing I need to get it done... not...
1960 Ford Falcon: Time’s Up
posted by GreaseGirl
Homebuilt Ford Falcon by Greasegirl #12 Last night Ethan and I stayed up all night working on the Falcon - I've never spent so much back-to-back time in the garage! When it came time when we were supposed to leave, we talked about quitting -but we were so close! We'd already added springs, shocks, distributor, belt, custom brake lines, fuel line, wiring, brakes, primed the engine, and were working to put back the front fenders and body. We continued working nearly 5 hours past the time initially scheduled to leave. Exhausted and delirious, it became obvious that there was still a good amount of time that needed to be spent checking over the car if we wanted to insure its safety before hitting the road. Knowing that we didn't want to take that risk - nor miss the entire day of Mooneyes...we decided to call it quits for the day and Kristin drove her 1955 Studebaker to the show. Although we were both disappointed by falling short of our goal of having Falcon ready for Mooneyes - we're thankful for the fun we've had, how well we've worked together, and...
1960 Ford Falcon: 12 Hours to Go!
posted by GreaseGirl
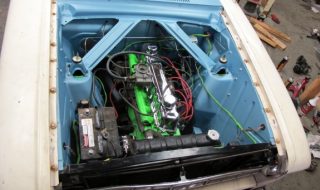
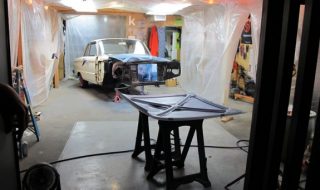
Homebuilt Ford Falcon by Greasegirl #11 There's only 12 hours left of this 10-day dash to get my 1960 Falcon ready for Mooneyes. The picture above shows where things are right now. A couple of obstacles have been ironed-out today - the distributor (which was a different size for the 144 and the 170) and brakes (whose new fittings we got weren't going to work quite right). Barring some other strange and uncorrectable obstacle, I don't see any reason why we won't get done... even though it may take staying up all night for! Next time you hear from me it'll either be at the show or not, do you think we can make it?!? Want to catch up? Here's where everything started: 12 Day 1960 Falcon Build #1 For more Falcon fun, check out Pikesan's project: 1963 Ford Falcon Wagon...

1960 Ford Falcon: 2 Days to Go – Getting Hooked Up
posted by GreaseGirl
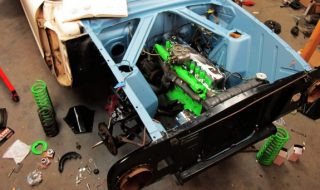
Homebuilt Ford Falcon by Greasegirl #10 Although many things are coming together - it seems like there's an endless list still to do! Some last parts still needed cleaned and painted today amidst our putting everything back on. While it's a little disappointing to see that pretty engine bay getting covered up in wires and tubes...it means that sooner or later we'll have a functional car! While it may look like there's not all that much progress from last night, there is! Suspension and brakes are almost in, all the linkages are hooked up (the most important part), and now we just have to keep pressing forward! I'm keeping this one short, because I was... In the Garage Until: 3:17am (Kristin who has to go to work in the AM), Ethan... still working Want to catch up? Here's where everything started: 12 Day 1960 Falcon Build #1 For more Falcon fun, check out Pikesan's project: 1963 Ford Falcon Wagon...
1960 Ford Falcon: 3 Days to Go – Engine is In!
posted by GreaseGirl
Homebuilt Ford Falcon by Greasegirl #9 One of the things holding us up from putting the engine in last night - is we couldn't attach the transmission without getting the pilot bushing out of the old engine and into the "new". Ethan called up a friend, who's the Go-To-Guy for getting things taken apart, to borrow the tool. His friend informed him no special tool is needed...just some toilet paper and water. If Joe-Schmoe were to say this, Ethan or I probably wouldn't have believed it... but since Go-To-Guy was telling us, it must be true. So Ethan grabbed a wad of wet TP and shoved it in the hole - followed by hammering a metal object that fit snugly through it (in this case a socket). Taking a hammer to the socket, the TP got smashed down and another wad of TP was added. Ethan was beginning to think he'd had his leg pulled when, after a few rounds of shoving TP in, the bushing began to smoothly get pushed out! Hydraulic pressure at it's best! Success and a smart new "tool" to keep filed away in...

1960 Ford Falcon: 4 Days to Go – Engine 1
posted by GreaseGirl
Homebuilt Ford Falcon by Greasegirl #8 After last night's final coat of paint, we're now working towards getting everything back together. I cleaned and painted steering and suspension parts while Ethan continued prepping the new engine block. It still feels like our progress is going a little slowly... but I'm thinking when the parts start getting bolted back in place things might speed up. While I was cleaning parts today, I found a new tool! I was looking for a larger wire brush when I found this $1.00 barbecue brush/scraper laying around. It looked like a good candidate for the job...and I was right. The wide brush with short bristles far surpasses the skinnier longer ones I've gotten before in the parts store - and it has an added bonus of the scraper on the end. Next time you see these for cheap, pick a couple up! We're ready to attach the transmission and hoist this sucker up and into it's new home. Catch up with us tomorrow for that - in the meantime, I'm the featured author over at Tinkernation.com this week. I write about some earlier progress...
1960 Ford Falcon: 5 Days to Go – Unmasked
posted by GreaseGirl
Homebuilt Ford Falcon by Greasegirl #7 I sanded the few rough spots with 320 grit and feathered them out slightly - then it was back to painting time! Falcon's second coat of Suede Metallic Hot Rod Flatz went on tonight. I sprayed first (which didn't seem as daunting as it did last night,) and Ethan took the gun for the last little bit getting a few hard-to-reach places. It's nice to be able to work together as a team! The finished product looks smooth and clean - the suede and metallic combined are dreamy! Peeling the masking tape and paper off was just like Christmas morning! It's exciting to see the many hours of sanding and prep pay off! Ethan also did most of the final assembly of the engine today - tomorrow he'll attach the transmission before we drop it in. The fan pulley off of the old engine is being transplanted and still needs painted, although I kind of prefer it rusty...that's just the hillbilly in me I guess! Keeping on schedule, some more parts got cleaned tonight. I also tested the result of clay-barring the original...
Agent Orange – Stuffed and Huffed 1968 Camaro
posted by pikesan
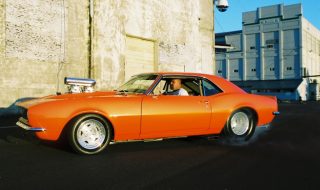
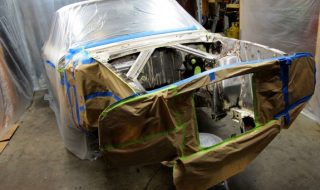
Homebuilt and Driven Hard 1968 Camaro Words and Pictures by Joe Casvin (click on any picture to see it full size) Most people just use their garages to store the stuff that just kind of builds up throughout life. Treasures like newspapers from 1976, a ten-year-old brand new exercise bike, or even a dingy and probably nasty smelling old cooler. You know, shit house door of a tuna boat smell? Jeff Chipman’s garage, however, had a far better hand to be dealt. Jeff used his garage to transform a bare 1968 Camaro shell into something that is both frightening and beautiful. Not an easy feat for your average Joe in your average two-car garage, and when you compound that with the fact that this is Jeff’s first ever attempt at building a car from the ground up... Well, you end up with something that is truly special and unique. “My first rig was a 1950 Chevy pickup I got when I was 15 years old. I started doing stuff to it after I got it. I’ve been messing around with cars and bikes all my life, just customizing them...

1960 Ford Falcon: 6 Days to Go – Paint Time
posted by GreaseGirl
Homebuilt Ford Falcon by Greasegirl #6 Today the color finally went on... isn't it purty! And goooooood thing I learned my lesson in mixing the primer, because this can was very gobbed up at the bottom. I didn't mind mixing too much though, because the swirls were so nice to look at! I'm using Kustom Shop 'Hot Rod Flatz' paint in Diamond Blue Metallic. I'd ordered these from TCP Global, and was happy with their prices and service. Before mixing with hardener and reducer, I made my mix can dummy-proof by marking it's 4:1:1/2 mix ratio with a sharpie. I found the paint to lay really nicely when I sprayed it - and with 16 oz. of paint I was able to cover the entire engine bay and underside of hood. I found the engine bay to be quite a challenge to spray - with it's many tight spots and corners. So not a surprise that this beginning painter ended up with a couple of boo-boos. One spot got small fisheyes (which happened to be in a very visible place) and a couple other spots of mild runs. As much as we...

1960 Ford Falcon: 7 Days to Go – Beginning Paint
posted by GreaseGirl
Homebuilt Ford Falcon by Greasegirl #5 We wanted to add a third layer of primer before laying color today. After a trip to register and insure the Falcon as well as pick up more supplies - we were back at it in the garage for a full weekend day. By the time the primer had dried and I'd painstakingly sanded the surfaces smooth (which took MUCH longer than I'd expected) it was already dark. With limited lighting in the shop, daylight seemed like a better time to spray color - so that's first thing on the list for tomorrow. In the meantime Ethan worked on some of the final engine assembly. Perhaps you were wondering if Falcon's inline-six would be going back in - and if so, did I already rebuild it? Yes and no. The original 144 straight-six will be going back in the car, but not just yet. I haven't rebuilt it, but it's in my plans to. (I know it isn't economical, but it's a great opportunity for me to do my first engine rebuild. And with Studie as my hot rod, I'd like to keep...
1960 Ford Falcon: 8 Days to Go – Primer
posted by GreaseGirl
Homebuilt Ford Falcon by Greasegirl #4 Tonight was primer night! We'd finished the prep and masking last night, all that was needed before starting was to clean up our workspace and do a last surface prep. I used a tack cloth and Kustom Shop's wax and grease remover to cover the surface to be painted and ensure it was completely clean. It's always amazing how much dirt those tack cloths pick up! I'm signed up to spray the color paint, so Ethan called dibs on spraying the primer - designating me as the paint mixer. I didn't get started with that job too well. I shook the paint can as I'd do with any other paint then opened it up and poured it up to the mix line after giving it a quick stir. Then I added the reducer and took it to Ethan. It looked awfully thin and he asked me if I'd stirred it - and I had a little bit, so I said "yes." We pondered over how thin the paint was... but hey, I've never sprayed primer on a car and assumed that's just...